Today in Blakeyrat is always several years behind in every tech trend news...
-
@mott555 what hot end do you currently have and what temperature does the TPU print at?
-
@Polygeekery It's a Wanhao i3 with a Micro Swiss all-steel hotend. My TPU print temp is 235 C.
-
@MrL said in Today in Blakeyrat is always several years behind in every tech trend news...:
@mott555 said in Today in Blakeyrat is always several years behind in every tech trend news...:
@Polygeekery The designer says TPU for the main part, and ABS for the retainer clip. That way you can sterilize it in boiling water. Any other filament will not survive boiling.
I'm not sure about that. You can print PLA from 180C up and TPU from 195C, not a huge difference. I think he wanted to say that you can sterilize all printed parts by boiling, with TPU the best pick because it's flexible - but he conflated those two talking points.
Not really. PLA goes to shit with extended exposure to higher temperature. It can't withstand boiling. Dark parts can't even withstand the heat of sun exposure.
-
As mentioned elsethred, I recently got myself a 3D printer. It's one of these; one of the local online retailers was selling it for a reasonable price. The thing comes Ikea-style, so I had to assemble it first. Took about ~4h one evening (but what else are you going to do these days?). Fun fact: the joints are actually magnetic balls that connect the rods to the sledges on the sides/the print head.
Surpisingly, the thing worked immediately in first few test prints. We have an old Ultimaker at work; I don't have a direct side-by-side comparison, but the Delta printer feels like it's faster with similar/better precision. At least when it succeeds.
A few more complex and long prints in, I discovered one of the more
 failure modes. If the print head rams the model at full tilt (i.e., during rapid repositioning), the forces overcome the magnetic connections, and the connecting rods fly all over the place. Good times. (The printer did not immediately sense that something was wrong either, so the hot-end kept heating and happily melting a hole into the print - definitively not going to let it do any unsupervised printing for a while.)
That particular failure also messed up something. I'm not quite sure what, but even after multiple resets, recalibrations, reseatings, retrimmings of piezos, retensionings and re-re-doings-of-stuffs, the print head would ram the print a few layers in, almost like it failed to take a Z-step.
Much failure later, somewhat at the end of my wits, I found a post that just suggested a bunch of random things to try out. I had already done most of it - the one item that I hadn't tried yet was removing the oil from the vertical guiding rods and reapplying it. I figured if I was going to do something like that, I might as well do it in style. So, drawing on Warhammer 40k, I put on some chanting in the background, got my finest machine oil (the "Unilube"), realized I didn't have any incense, and got to work.
Printer seems to work again (one of the overhang test still fails, need to try it with the other filament again). I learned two things. I still hate debugging hardware problems. And, in case I ever need to fix something on the go, I should have some demontic chanting ready on my mobile phone.
-
@cvi said in Today in Blakeyrat is always several years behind in every tech trend news...:
And that, in case I ever need to fix something on the go, I should have some demontic chanting ready on my mobile phone.
This helps for software issues too.
-
I only got one mask printed off before my new hotend plugged up.
 The old hotend is still soaking in acetone.
-
This post is deleted!
-
@cvi said in Today in Blakeyrat is always several years behind in every tech trend news...:
the print head would ram the print a few layers in, almost like it failed to take a Z-step.
Multiple magnetic de-cohesion events later I have determined that I was probably (also) overextruding, causing the printed object to be larger than it should.
I found some settings that allow a print to complete successfully occasionally, i.e., that are neither overextruding nor massively underextruding. I'm probably still underextruding a bit, but it beats having to find the rods and small magetic balls after they've flown all over the place. (Also, I kinda dig not having the hotend on the loose, melting its way through the print while adding more material to the mess.)
-
@mott555 said in Today in Blakeyrat is always several years behind in every tech trend news...:
I only got one mask printed off before my new hotend plugged up.
The old hotend is still soaking in acetone.TPU?
I know lots of people suggest cold pulls and other stuff. Those work sometimes but my standby, pain in the ass, but so far works 100% is to heat the hot end up to print temperature, remove the nozzle, release the extruder clamping pressure and ram a bunch of filament through. Do it quickly and once the big blob of shit that was clogging up the works clears the hot end snip it off and yank the filament back out before it melts too much. Put in a new nozzle and you are good to go. Toss the old nozzle in solvent and let it soak until you get around to it.
-
@cvi said in Today in Blakeyrat is always several years behind in every tech trend news...:
Also, I kinda dig not having the hotend on the loose, melting its way through the print while adding more material to the mess
And potentially starting a fire. That's always a plus.
Well, unless you're me. I always dig a good fire.....at someone else's house. Heeeyyyyyyy, anyone want to try some of my nifty handcrafted G-code?
M104 S2500
-
I'm not doing anything as cool as ya'll are, but I am working on a prototype for a board game I hope will be fun.
I just got some parts laser cut by ponoko.com. Two week wait. Laser cutter is on my xmas list.
-
@Polygeekery said in Today in Blakeyrat is always several years behind in every tech trend news...:
Heeeyyyyyyy, anyone want to try some of my nifty handcrafted G-code?
Precede that one by a very aggressive G0, and you can probably have the printer chuck the hothead right off the printer into whatever's nearby.
-
Yesterday I cleaned out the area I 3D print in. I didn't realize just how much I've printed since starting this hobby. I found 13 empty boxes on the shelf where I keep my filament and that's not even all the filament I've used. It's just the ones that got used up and never had the box thrown away.
That's a fair amount of filament that I've printed. I honestly didn't think I had used that much. No wonder my carriages are getting noisy. I assumed it was just that I've had them running basically 24/7 for the past week or two printing masks and ear savers and such.
-
@Gąska said in Today in Blakeyrat is always several years behind in every tech trend news...:
@gurth everything related to your hobby is sensible by definition. Saying that something makes sense for a hobby is a tautology.
The opposite of this. A hobby is something you do because it's enjoyable, not because it's sensible. If it was sensible, it wouldn't be a hobby; it'd be a business.
-
@brie said in Today in Blakeyrat is always several years behind in every tech trend news...:
The opposite of this. A hobby is something you do because it's enjoyable, not because it's sensible. If it was sensible, it wouldn't be a hobby; it'd be a business.
Maybe, maybe not.
I got in to this particular hobby because I could buy the printer and filament and be $700 ahead of what I wanted to buy.
Speaking of, I'm about to print another copy for a friend. The first time I built one the body took ~3 days to print. Now that I've learned more and upgraded my printers and learned how to build print profiles that time has dropped to 18.5 hours. Not a bad time savings.
-
@Polygeekery said in Today in Blakeyrat is always several years behind in every tech trend news...:
I'm about to print another copy for a friend. The first time I built one the body took ~3 days to print.
This just sent me on a tangent (thanks Altered Carbon)...
-
Somebody linked me this:
-
@JBert It's not lego unless you are using lego bricks.
-
Question to those in here who have been longer at this than I have. As you may have surmised from my previous posts, I have had some issues with prints failing.
Recently I attempted a what I think is relatively simple print (see image below). The print head would get stuck at different locations, (fortunately) often quite early on. Typically what happens is that the print head would start scraping against the print, and soon thereafter get stuck completely, detach from the printer or have the belts slip and start printing in air. Occasionally, I would hear the extruder "click" prior to the above, which I've since learned is the sound it makes when it can't push the filmanet further. I think that may have been cause by nozzle being so close to the print surface that it would be blocked completely.
I've played around with a few settings between different attempts, mainly the speed and the flow rate (but also minor adjustments to the temperature), but none would really resolve the situation. I ended up trying a different filament (same brand, though), and have since competed multiple prints successfully.
Not entirely sure what to make of that, or what is causing what. Could be that I got a crappy batch of filament, although I'm not entirely sure how that would cause the above issues. Could it be that the extruder slipping could somehow be the cause of the latter (in contrary to what I mentioned above)? How often do you get a crappy batch of filament anyway?
Part in question. Not my design, though I messed with it slightly.
-
@cvi
In my prints print head scrapes model quite often, when printing 'insides'. It has zero influence on the end result and it never got stuck. I can prevent that by setting z-hop, but eh, who cares.The only bad filement batch I got was the 'free' sample that came with the printer.
In other words: I have no answers for you.
-
@cvi I don't even have a 3d printer but at a guess, it sounds to me like the head was too close to the work. Since it happened after printing a while, I'd guess the layer thickness being laid down didn't match the drivers' expectation, which I'd guess means the filament was thicker than expected or not of consistent thickness.
-
@MrL said in Today in Blakeyrat is always several years behind in every tech trend news...:
In my prints print head scrapes model quite often, when printing 'insides'. It has zero influence on the end result and it never got stuck. I can prevent that by setting z-hop, but eh, who cares.
Z-hop is enabled, but as mentioned, the print head gets stuck, which results in detaching the object from the bed or in the driver belts skipping steps (which messes up everything else).
-
@PleegWat said in Today in Blakeyrat is always several years behind in every tech trend news...:
I don't even have a 3d printer but at a guess, it sounds to me like the head was too close to the work.
Yeah. I'm trying to figure out why. :-)
Since it happened after printing a while, I'd guess the layer thickness being laid down didn't match the drivers' expectation, which I'd guess means the filament was thicker than expected or not of consistent thickness.
I was also guessing at this, which is why I was playing around with the flow rate (which, if I'm not entirely mistaken is the rate at which the filament is extruded). I went down to around 70%, which didn't fix the getting-stuck problem, but also created a bunch of others.
-
@cvi said in Today in Blakeyrat is always several years behind in every tech trend news...:
The print head would get stuck at different locations, (fortunately) often quite early on.
How early? Approximate layer number or percentage completion?
@cvi said in Today in Blakeyrat is always several years behind in every tech trend news...:
Typically what happens is that the print head would start scraping against the print, and soon thereafter get stuck completely, detach from the printer or have the belts slip and start printing in air.
What material and what are your printing temperatures?
@cvi said in Today in Blakeyrat is always several years behind in every tech trend news...:
Occasionally, I would hear the extruder "click" prior to the above, which I've since learned is the sound it makes when it can't push the filmanet further. I think that may have been cause by nozzle being so close to the print surface that it would be blocked completely.
Sounds like it was losing steps. If so then you are either trying to print too fast, or at too low of a hot end temperature, or your initial layer height was too low, or some combination of the above.
Or, it could be shitty filament causing nozzle clogs since changing filament brands seems to have helped. Lower quality filaments definitely cause more clogs IME. But if your initial layer height is too low it spikes the nozzle pressure and can cause you to lose steps. You get similar high pressures when trying to print too fast or at too low of a hotend temperature.
As for the print head getting stuck or hitting your model and losing steps, by any chance were you printing ABS? I usually get this problem as a result of the print object curling up on the edges. Then when the nozzle tries to traverse that area again it hits the print object and either the object will get jarred loose or the steppers lose some steps or the belt will slip. It might not be a bad idea to check your belt tension as if it were low enough then it could slip on lower resistance and cause this when other printers would carry on.
On prints that are more likely to curl up you can give yourself a fighting chance of recovery by setting the combing in your slicer to "within infill". With that set your nozzle should always stay within the perimeters of the print and won't travel outside of the object and then it can't hit on an outside edge and cause this. Curling up can also cause increased nozzle pressures. The printer expects a clearance equal to your layer height but curling can reduce that to zero, it still tries to extrude a certain volume but because of the curling it is like the nozzle is jammed.
Worth noting, some filaments are more likely to curl than others.
When you level your bed, do you do it when your machine is at temperature? Bed surfaces expand as they heat, which reduces your clearance. They can also warp, reducing your clearance in some areas or increasing it in others.
So, basically, almost anything can cause what you are describing. If you're printing ABS or other materials that are likely to curl then I would recommend you try some sort of enclosure to reduce the temperature delta between print temperature and ambient temperature. But make sure you are starting with a properly leveled bed, that is leveled while at operating temperature for your print and has had a little bit to stabilize. ABS and PETG also require a bit more initial layer clearance than PLA. I will set my initial layer height with a piece of decent quality copy paper. With ABS and PETG I set it with a note card or other thicker paper stock like a thin business card. Don't use really cheap, thin, paper. If you need more bed adhesion on ABS and other materials that don't like really close nozzle to bed clearances then you can try increasing your flow rate on initial layers.
-
@PleegWat said in Today in Blakeyrat is always several years behind in every tech trend news...:
@cvi I don't even have a 3d printer but at a guess, it sounds to me like the head was too close to the work. Since it happened after printing a while, I'd guess the layer thickness being laid down didn't match the drivers' expectation, which I'd guess means the filament was thicker than expected or not of consistent thickness.
That's not really possible unless you have something wrong with the configuration of your printer mainboard like having the wrong number of steps set for Z height movement. The nozzle irons on the layers so everything is in reference to that last layer.
It is however possible to have the opposite problem. If your bed is not leveled properly then your first layers it can try to print in midair and as you can imagine that causes problems with bed adhesion.
-
@cvi said in Today in Blakeyrat is always several years behind in every tech trend news...:
I was also guessing at this, which is why I was playing around with the flow rate (which, if I'm not entirely mistaken is the rate at which the filament is extruded). I went down to around 70%, which didn't fix the getting-stuck problem, but also created a bunch of others.
Oh god, yeah, that will cause some issues.
Have you ever verified your e-steps? Also, do you have a micrometer? You don't need an expensive one, but I consider one almost essential unless you are buying very high-end filaments. I will occasionally see variations of 0.05mm or more in some filament brands. So anytime I change filament I will mic it a few times along a half a meter of filament or so and set my filament diameter based on the measured diameter and not just assume that it is exactly 1.75mm.
-
@Polygeekery said in Today in Blakeyrat is always several years behind in every tech trend news...:
How early? Approximate layer number or percentage completion?
Varies, though quite often on the second or third layer. Occasionally a bit later.
What material and what are your printing temperatures?
PLA. The advertised temperatures are 190*C-210*C. I've been playing around in that range.
I got a bit of a random assortment for playing around initially. The one that fails is relatively plain (this one), I've had more success with this and this.
Sounds like it was losing steps. If so then you are either trying to print too fast, or at too low of a hot end temperature, or your initial layer height was too low, or some combination of the above.
I've varied the initial layer height between 0.3mm and 0.2mm (0.3mm is the default that cura has for the printer; 0.2mm was recommended somewhere on printer's website). Following layer height is 0.1 mm(and apparently the printer should be capable of 0.05mm, though I've not gotten around to testing that). Default speeds were around 35mm/s (most) to 45mm/s (infill) with the initial layer at 20mm/s. I've tried lowering all speeds to 20mm/s, though have since gone back to 35mm/s (except for the initial layer). I've also lowered the travel speed from 180mm/s (I think) to 120mm/s.
With the settings mentioned above, that one filament tends to crash, whereas the others tend not to. (Not a 100% success rate either.)
Or, it could be shitty filament causing nozzle clogs since changing filament brands seems to have helped. . Lower quality filaments definitely cause more clogs IME. But if your initial layer height is too low it spikes the nozzle pressure and can cause you to lose steps. You get similar high pressures when trying to print too fast or at too low of a hotend temperature.
Same brand, different "series" (I guess).
I'll try increasing the initial layer height a bit, sicne that's the one that I've left mostly alone (at its default of 0.3 / 0.2). I'll try out printing a bit hotter with the filament that I'm struggling with, see if that helps anyway. (Thinking back, I unfortunately didn't take a very organized approach when playing around with the settings, but now that you've helped narrow down the key ones, I can probably do a bit better.)
As for the print head getting stuck or hitting your model and losing steps, by any chance were you printing ABS? I usually get this problem as a result of the print object curling up on the edges.
No, only PLA so far. The printer is in the office edge of my living room. I don't know how bad ABS actually gets, but I'd rather avoid sitting in a room stinking of molten plastic for now. Maybe will try later.
I've seen the curling up happening when dealing with overhangs (still PLA), but not otherwise. Haven't really had the chance to see what I can do about that case (usually the problem has been getting that far, though after switching filament, I'm having a bit more luck).
From my understanding, lowering the temperature should help with overhangs in general (i.e., reduce the curling up)? At least assuming the temperature doesn't get too low for other stuff.
On prints that are more likely to curl up you can give yourself a fighting chance of recovery by setting the combing in your slicer to "within infill".
Yeah, will try that.

When you level your bed, do you do it when your machine is at temperature?
The bed isn't heated, although the machine does heat up the nozzle halfway before doing the leveling. I'm currently printing on a glass plate with some stick glue on.
I will set my initial layer height with a piece of decent quality copy paper. With ABS and PETG I set it with a note card or other thicker paper stock like a thin business card. Don't use really cheap, thin, paper. If you need more bed adhesion on ABS and other materials that don't like really close nozzle to bed clearances then you can try increasing your flow rate on initial layers.
The printer is self-calibrating (the bed sits on a bunch of piezo sensors), so I can't change the initial layer clearance very easily; I only have access to the settings in the slicer (using cura). Might be possible to do something via gcode, but I'd like to avoid hacking around in gcode for now.
Anyway, thanks for the exhaustive reply, will try out the suggestions (for some of the stuff it seems that I wasn't entirely off the rails already, but it's good to get a bit of confirmation - way too easy to get lost in the pile of settings that one can change).
-
@brie said in Today in Blakeyrat is always several years behind in every tech trend news...:
@Gąska said in Today in Blakeyrat is always several years behind in every tech trend news...:
@gurth everything related to your hobby is sensible by definition. Saying that something makes sense for a hobby is a tautology.
The opposite of this. A hobby is something you do because it's enjoyable, not because it's sensible. If it was sensible, it wouldn't be a hobby; it'd be a business.
Depends on how you look at it. As a manufacturing process, yes, it probably doesn't make sense. But as an activity - you're having fun, don't you? So it makes sense to continue doing so.
-
@Polygeekery said in Today in Blakeyrat is always several years behind in every tech trend news...:
Have you ever verified your e-steps?
Sorry, e-steps?
Also, do you have a micrometer? You don't need an expensive one, but I consider one almost essential unless you are buying very high-end filaments. I will occasionally see variations of 0.05mm or more in some filament brands. So anytime I change filament I will mic it a few times along a half a meter of filament or so and set my filament diameter based on the measured diameter and not just assume that it is exactly 1.75mm.
That might actually be it. Although the micrometer that I have is of very dubious quality, the noisy output that it produces hovers around 1.80mm (peaking slightly above, at ~1.82mm in the ~1m that I tested) when testing the filament that I'm having trouble with. One that I'm having more success with is much closer to the 1.75mm mark.
Edit: Although wouldn't lowering the flow rate account for this?
-
@cvi said in Today in Blakeyrat is always several years behind in every tech trend news...:
The bed isn't heated, although the machine does heat up the nozzle halfway before doing the leveling. I'm currently printing on a glass plate with some stick glue on.
I think we found your problem.
They say that you can print PLA on unheated beds, but IME you will still have adhesion and curling issues.
The problem you are dealing with is that as the plastic cools it retracts and causes the print to curl up like a potato chip. When your bed is heated the temperature delta is 30-40C less than as compared to room temperature. In addition, prints stick better to heated beds. On my printers I have to wait for the bed to cool before the prints will easily release.
On the same note, make sure your cooling fan is off for the first layer.
@cvi said in Today in Blakeyrat is always several years behind in every tech trend news...:
The printer is self-calibrating (the bed sits on a bunch of piezo sensors), so I can't change the initial layer clearance very easily; I only have access to the settings in the slicer (using cura). Might be possible to do something via gcode, but I'd like to avoid hacking around in gcode for now.
Ahhhhh. Is it a delta printer?
If the easy things don't work, you may look in to either a heated bed upgrade or making an enclosure out of fire retardant foam. Heated beds are amazing for 3D printing. I've never had a printer without one but I find it kind of amazing how the prints are locked down until the bed cools.
Since you can't vary your bed leveling height and that is taken care of in your slicer, maybe try running an initial layer height of 0.15mm at 105-110% flow and then going to defaults after that? Running higher flow and/or increasing your line width to 1.25-1.5X your nozzle diameter can help get the first layer "squish" just right to help bed adhesion.
Also, what are you using for bed adhesion? As in, have you tried printing on a raft or using a brim? With ABS I almost always print on a raft. It helps take up the slack if your bed is not leveled well. Once it gets the raft printed down it functions the same as a precisely leveled bed. Since the printer printed it you can be reasonably sure that it is leveled to the nozzle. It also gives you a much greater surface area to the bed for adhesion. Given your non-heated bed, if you aren't using a raft that would be where I would start.
Speaking of, I'm going to step back:
@cvi said in Today in Blakeyrat is always several years behind in every tech trend news...:
From my understanding, lowering the temperature should help with overhangs in general (i.e., reduce the curling up)? At least assuming the temperature doesn't get too low for other stuff.
Since you are just starting out, keep your temperatures up and use support to help with overhangs. Almost any printer should be able to print to 45 degrees on overhangs without any real issue.
And one final thing: I find that most printers and most out of the box slicing profiles run the cooling fans too high. Cooling is a balancing act. Lots of people have overdone it, IMHO. You will see lots of models for upgraded cooling on most printers.
Cooling helps with some things: detail, overhangs, printing faster and bridging. With adequate cooling and the right G-code you can bridge gaps of several inches. It does it by fast travel moves, pumping out the filament and as it strings the fans lock it in place by cooling very fast.
But that comes at a cost. Layer adhesion. Reducing cooling fan speed, or even turning it off entirely, can really increase model strength. Too much cooling prevents the layers from fusing together as well as they can. Printing slower (more time to heat the prior layer as material fuses in place), with line widths increased (more overlap in layers) and less cooling (again, more fusing between layers) really increases part strength.
I've gotten to the point that I cut my fan speed to 20-50% and then use bridging overrides in my slicer to help with bridging. But that gets in to advanced stuff. Walk before you run. It's just something to think about. If your fan is running too fast it might make the curling/adhesion problems worse.
-
@cvi said in Today in Blakeyrat is always several years behind in every tech trend news...:
way too easy to get lost in the pile of settings that one can change
Yes. Absolutely.
Cut your slicer back to "Basic" and maybe look for slicer profiles for your printer online. Give yourself a baseline to work from.
-
@cvi said in Today in Blakeyrat is always several years behind in every tech trend news...:
Sorry, e-steps?
https://all3dp.com/2/extruder-calibration-6-easy-steps-2/
Basically you are verifying that when you tell your printer to extrude Xmm of filament it is actually doing so.
I found that when I checked my printers they were off by 5-15% or more and were under extruding. If I told it to extrude 100mm of filament they probably averaged ~90mm out of the box.
This also varies with filament. Your extruder bites in to your filament to feed it. The amount that those teeth bite in changes the effective diameter of your extruder gear. Most default calibrations are based on the outer diameter of the extruder gear. But that will never be accurate because of what I just mentioned.
This is also different for each type of filament that you use. You might even have differences from roll to roll. Each time I load a roll of filament I heat up the nozzle, mark off 120mm, tell the printer to feed 100mm of filament and then measure how much was actually fed. If it actually fed 92mm of filament then I pop back to the terminal, send a M503 and then whatever the extruder steps are set to I would divide that by .92, send the new value to the printer with a M92 command, M503 to commit. If you want you can do the measure routine again but I find that will get me well within a millimeter on the first try.
Sounds complicated, actually isn't.
Since you only run one printer you could mark on each roll what the e-steps are and then not have to go through the calibration when changing back to a filament you have previously used.
Make sense? Clear as mud?
-
@Polygeekery said in Today in Blakeyrat is always several years behind in every tech trend news...:
On the same note, make sure your cooling fan is off for the first layer.
It is, that's one of things I've actually not messed with. :-)
Most of the things are at the default settings for the printer, and I started mainly by modifying stuff mentioned specifically for the printer online by others. Unfortunately it doesn't seem to be the most common model, so I've not found too many sources so far.
Ahhhhh. Is it a delta printer?
Yep, sorry, should have mentioned that (I think I might have mentioned it in an earlier post).
If the easy things don't work, you may look in to either a heated bed upgrade or making an enclosure out of fire retardant foam. Heated beds are amazing for 3D printing. I've never had a printer without one but I find it kind of amazing how the prints are locked down until the bed cools.
I'll keep that in mind, though might take a bit until I get around to doing that. Apparently there are connections exposed on the board for running a heater; I've not looked to much into it yet. There are also some sketches for enclosures online, though printing them in PLA seems ... unstable.
Since you can't vary your bed leveling height and that is taken care of in your slicer, maybe try running an initial layer height of 0.15mm at 105-110% flow and then going to defaults after that? Running higher flow and/or increasing your line width to 1.25-1.5X your nozzle diameter can help get the first layer "squish" just right to help bed adhesion.
Will try that.
Also, what are you using for bed adhesion? As in, have you tried printing on a raft or using a brim?
Mainly with a brim. Haven't tried a raft yet. Did play around with just a skirt. It works when it works, but I observed too many detached and/or warped parts.
Almost any printer should be able to print to 45 degrees on overhangs without any real issue.
45 degree overhangs aren't giving me much problems, though.
 If the prints don't fail early on, the tests that go to 70* to 75* of overhang mostly are fine. Been trying with this one, and it's mostly fine (some unevenness on the underside occasionally).
And one final thing: I find that most printers and most out of the box slicing profiles run the cooling fans too high.
I'll do a few runs while trying to lower the fan speeds, and try raising the temperature a bit. I've been mostly sticking to the middle of the suggested range (e.g., 200C for a range of 190C to 210*C). I've left the fan speed settings pretty much alone and the default profile sets them to 100% after a while, so that sounds like it could be a problem.
-
@Polygeekery said in Today in Blakeyrat is always several years behind in every tech trend news...:
Cut your slicer back to "Basic" and maybe look for slicer profiles for your printer online. Give yourself a baseline to work from.
Did that a few times, unfortunately not too many profiles online, so I had to mostly work of the default one that is included in cura.
Setting the slicer back to "Basic" again sounds like entirely reasonable advice that I should follow, but I know myself well enough that that will last about 5 seconds. I'm actually quite proud of myself given that I've managed to keep most of the settings to the profile-given defaults. (In fact, I only really started messing with them after having problems with multiple prints.)
-
@Gąska said in Today in Blakeyrat is always several years behind in every tech trend news...:
@brie said in Today in Blakeyrat is always several years behind in every tech trend news...:
@Gąska said in Today in Blakeyrat is always several years behind in every tech trend news...:
@gurth everything related to your hobby is sensible by definition. Saying that something makes sense for a hobby is a tautology.
The opposite of this. A hobby is something you do because it's enjoyable, not because it's sensible. If it was sensible, it wouldn't be a hobby; it'd be a business.
Depends on how you look at it. As a manufacturing process, yes, it probably doesn't make sense. But as an activity - you're having fun, don't you? So it makes sense to continue doing so.
Sure, but if you're not profiting from it, and you don't enjoy it... what's there to talk about? You're probably not even doing it.
So if you're doing something, it's because it results in either some sort of benefit, or some sort of gratification. You can say that they're both "sensible" in their own way, but that's in two different ways; it's natural to differentiate between them, because the former is "work" and the latter is "leisure." If you're lucky, you find things that cover both spheres - working out or playing sports might give both physical benefits (fitness) and gratification (you enjoy it), for example. But most of the time, your primary source of income isn't something that you'd find enjoyable enough that you'd also spend your leisure time doing it (or at least you'd heavily modify it to focus on things you do enjoy).
-
@Polygeekery said in Today in Blakeyrat is always several years behind in every tech trend news...:
Make sense? Clear as mud?
Yeah, makes sense. Will do.
-
@cvi said in Today in Blakeyrat is always several years behind in every tech trend news...:
Haven't tried a raft yet.
Go back to all defaults, use a raft, make sure that supports are turned on. I might be willing to wager that would probably work.
As part of laying down the raft the printer lays down thick lines that criss cross each other. In the process it:
- increases the surface area that adheres to the bed
- ensures that whatever surface it is printing on is by its very nature level to the nozzle
With ABS I use the rafts both to make for better adhesion and also so that if there is some minor curling around the edges hopefully it levels out before it starts printing the actual model.
The model you showed earlier is hard to make out in that render. Is it from Thingiverse or somewhere else? If so, could you share a link?
-
@Polygeekery said in Today in Blakeyrat is always several years behind in every tech trend news...:
Go back to all defaults, use a raft, make sure that supports are turned on. I might be willing to wager that would probably work.
I'll do a test run with the rafts, probably tomorrow. Still not entirely comfortable running the printer unattended.
As mentioned initially, there is one filament that I have a lot of problems with; with other filaments I have less trouble (not entirely problem free either, though). Still, the tips mentioned above were helpful even with the filaments that work - a short test run with less fan power did seem to look better in terms of layer adhesion.
With ABS I use the rafts both to make for better adhesion and also so that if there is some minor curling around the edges hopefully it levels out before it starts printing the actual model.
I don't know if I have that much problems with adhesion. Some prints did detach initially or started lifting off in one end, but that I've mostly gotten under control by being a bit more careful about properly applying the glue before printing and by increasing the brim for another few layers. However, using the raft to compensate for imperfect calibration / bed leveling seems worth trying out, I'm not entirely sure I fully trust the auto calibration.
The model you showed earlier is hard to make out in that render. Is it from Thingiverse or somewhere else? If so, could you share a link?
It's essentially the front panel of this, but with the sides cut off (modified .stl). Nothing special, and I did manage to print it after a many attempts. What was bugging me is that the failures were frequently early on, while printing the flat face. I noticed that some other parts that I printed in another filament had seemingly much less trouble, despite being much more complex (and In one case, despite me fucking up the modeling and having one part not be entirely flat).
For the stand (unmodified from thingiverse), I initially did a few attempts with the "bad" filament, which all had problems (head scraping against the print hard early on). After switching filaments, the first attempt completed -- admittedly that makes for bad statistics, since I didn't continue trying afterwards.
-
@Polygeekery said in Today in Blakeyrat is always several years behind in every tech trend news...:
Go back to all defaults, use a raft, make sure that supports are turned on.
After having some evenings and a bit time to play around with all the suggestions mentioned above, I have to say that print quality and reliability did improve quite a bit (so, hey, thanks @Polygeekery for taking the time to type all that up!).
The raft helped indirectly, by helping me figure out a rather fundamental problem, which is that the auto-calibration routine sometimes produces garbage. Rule of thumb seems to be that I need to re-run it a couple of times, and if the second or third time takes less than ~3 iterations, things seem to be OK. Not great, but at least manageable.
Turning down fans and increasing the print temperatures did improve layer adhesion and make for much more stable prints. Running the fans at 100% was probably stupid, not sure where I picked that setting up from. Reinstalling/upgrading cura to a newer release defaults the setting to around 30%-40% depending on the material.
Some things (e.g., heated bed) will likely have to wait for a bit, though.
-
@cvi said in Today in Blakeyrat is always several years behind in every tech trend news...:
After having some evenings and a bit time to play around with all the suggestions mentioned above, I have to say that print quality and reliability did improve quite a bit (so, hey, thanks @Polygeekery for taking the time to type all that up!).
No worries. Part of the reason that I could be so helpful is that I am also a relative noob in this area. But I tend to dive in and immerse myself in new hobbies. So all my early fuckups are still fresh in memory. For that matter, so are recent fuckups. I currently have a hotend entirely encased in ~300 grams of PLA for some reason. Fun times. Good thing I have spare parts.
@cvi said in Today in Blakeyrat is always several years behind in every tech trend news...:
The raft helped indirectly, by helping me figure out a rather fundamental problem, which is that the auto-calibration routine sometimes produces garbage. Rule of thumb seems to be that I need to re-run it a couple of times, and if the second or third time takes less than ~3 iterations, things seem to be OK. Not great, but at least manageable.
I've always been skeptical of how those mechanisms could work well. There's a lot of variability in where they trip at. Which will affect the accuracy of the process.
As most everyone knows, I tend to like firearms. Testing the trigger on firearms can be problematic. If the firearm has been sitting for a while and you test the trigger pull it will give a much different result than if you dryfire it 10+ times before taking a reading. I have to assume the same phenomenon occurs here.
@cvi said in Today in Blakeyrat is always several years behind in every tech trend news...:
Turning down fans and increasing the print temperatures did improve layer adhesion and make for much more stable prints. Running the fans at 100% was probably stupid, not sure where I picked that setting up from. Reinstalling/upgrading cura to a newer release defaults the setting to around 30%-40% depending on the material.
Most profiles seem to default to that bin fairness it will produce greater detail and better bridging. Most people who get 3D printers print trinkets from Thingiverse for their first several prints. Layer adhesion isn't as big a deal for them as is better detail. And heated beds help a bunch. They are almost mandatory IMHO.
-
Not sure why youtube recommended this to me, but figured it might be interesting to others:
-
 Can you 3D print Damascus steel? Pretty much, yeah
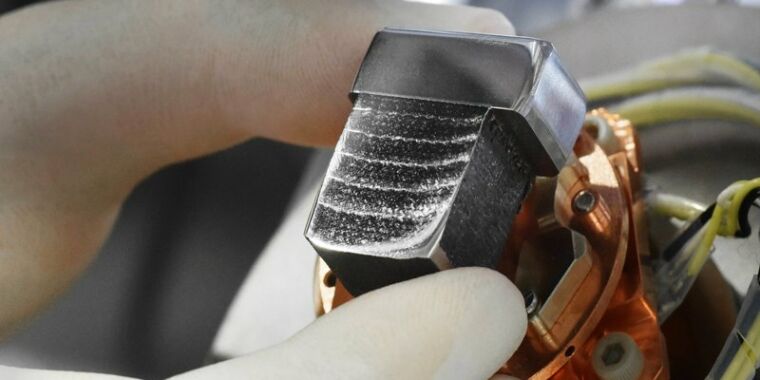
Steel structure is controlled with clever use of the laser.
-
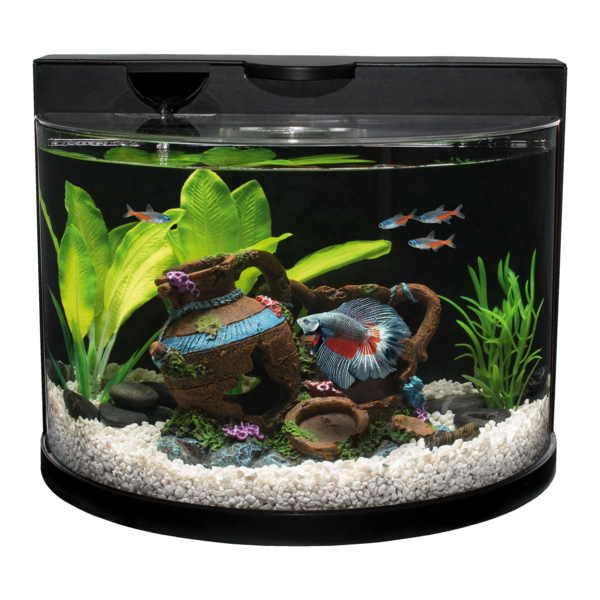
For quite a while now we have had a Betta fish in our kitchen area in a pseudo-aquaponics type fishbowl like this:

It always bugged me because there was no way to have any sort of filter or water movement. Betta fish do not technically need a filter. They evolved to live in shallow puddles in rice paddies and ditches. This is also where their territorial "Fighting fish" nature comes from. If another male invaded your stagnant little puddle then he was definitive competition for any females that may also come along to that stagnant puddle. Something else I have always found interesting about them is that they have what is called a "labyrinth organ" that allows them to breathe air, and in fact they have to have access to the surface to breathe air or they will basically suffocate/drown.
Couple the no filter thing with that particular container being very small and I've been on the lookout for quite some time for a small tank for our kitchen Betta. But I wanted to keep the plants growing from the tank. Well, the other day I was in PetSmart and there was this aquarium:
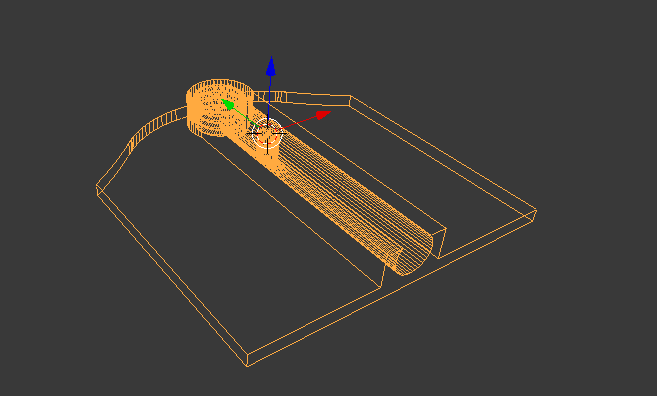
For sale for a steep discount because the box was damaged. Self contained filter in the back, and a fairly simple design for the tank. It has a lid molded from polycarbonate, easy enough to make a new top for it. I get it home, set it up and move our Betta over. Today I had about an hour so I put the lid on my flatbed scanner on my printer, scanned it, and sat down with calipers to design a new top.
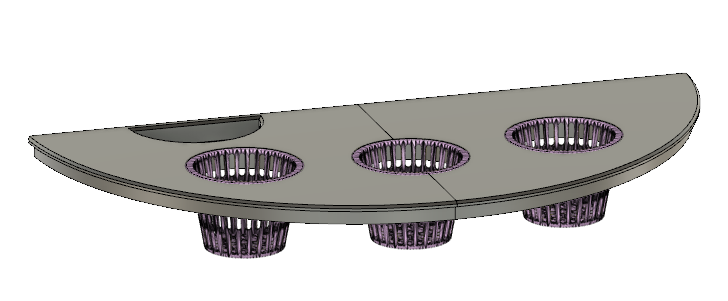
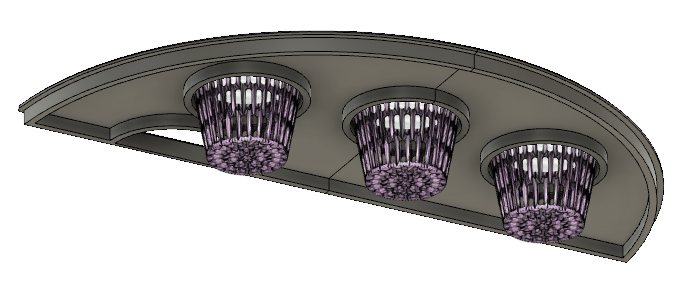
I found the basket on Thingiverse and just imported the mesh and made the openings to fit. I am undecided on whether I want to design new baskets, or perhaps make one large basket for the center. I also split the body in half so that I can print it in two pieces and glue together after printing. This will sort of be a first for me in that department. I will probably print in ABS and glue together with acetone and then acetone smooth the entire part after that. The other option would be to print in PETG (high strength and less likely to sag over time) and join the parts with epoxy, but then I would probably have to sand and paint afterwards.
I am test printing a basket at the moment so I can get a feel for the size. They are ~50mm in diameter and 38mm high. Seems like the right size, but it is always hard to tell until you have it in your hands.
-
Question for the electronics nerds around here:
My bed heaters are all 24V heaters. I have been considering upgrading them to 110V AC bed heaters but then had a thought. I have several 36V and 48V power supplies around here. Would I be able to break out the wires that go to the bed heater and power them from one of the higher voltage power supplies and get quicker bed heating without damaging anything? IOW, Is there likely to be a difference in bed heaters for various voltages besides the resistance, and would "overclocking" a heater in such a fashion be a supremely poor idea?
I have looked at other bed heaters and they list them being 12V/24V, with the caveat that they will output different wattages depending on supply, of course. But I do not see many listed for higher voltages unless you step up to a mains heated bed.
-
@Polygeekery As long as you limit the current properly to "not go up in flames" levels, I don't see much of a problem.
48V has the added advantage that you'll notice unprotected wires very quickly when you touch them or anything they're connected to.
-
@Rhywden said in Today in Blakeyrat is always several years behind in every tech trend news...:
48V has the added advantage that you'll notice unprotected wires very quickly.
Well, we will just call you Mr. Brightside.
I'm in the process of building a whole printer enclosure thing to get them all away from drafts and to help with ABS and PETG prints. My thinking is that if I can bump up the bed heater output a bit I wouldn't have to worry about adding heaters to the enclosures.

I already have the heaters. I scored some space heaters that have a low setting of ~350w. I could control them via Marlin or via OctoPrint, either way. But it would be nice to not need that.
The enclosure will be drywall inside, with a wooden skeletal frame and 1.5" of fireproof insulation foam and then either drywall or thin plywood on the outside. It should be reasonably fireproof, but I would prefer to not ever have to test that.
-
It depends on how your bed heater is regulated.
If there's a temperature sensor and it uses proportional or PID regulation, it's probably fine. Otherwise, you can end up with temperature overshoots, overheating damage, or even fire (but maybe you consider that a feature
 ).
).Also, check that your printer can safely handle the higher voltage.
@Rhywden said in Today in Blakeyrat is always several years behind in every tech trend news...:
48V has the added advantage that you'll notice unprotected wires very quickly when you touch them or anything they're connected to.
Based on the photograph of @Polygeekery's hands from the other thread, I wouldn't be so sure.
-
@Zerosquare said in Today in Blakeyrat is always several years behind in every tech trend news...:
It depends on how your bed heater is regulated.
If there's a temperature sensor and it uses proportional or PID regulation, it's probably fine. Otherwise, you can end up with temperature overshoots, overheating damage, or even fire (but maybe you consider that a feature ).
Also, check that your printer can safely handle the higher voltage.The heaters are PID controlled via the firmware on the board. In this case I would not have to worry about the board handling the voltage because I would use the 24V that normally powers the bed to control a MOSFET that would switch the higher voltage to the bed heater. Make sense?
And you can run a PID autotune any time you want to, and I would do so after wiring up my monstrosity of a bodge to power the heater from a second power supply. I think that nominally the bed heater is 240W at 24V, which would put resistance at 2.4ohms. But that would make my heater output 540W at 36V, correct?
That seems a bit much. 2.25X the normal power output.
-
@Polygeekery said in Today in Blakeyrat is always several years behind in every tech trend news...:
It should be reasonably fireproof, but I would prefer to not ever have to test that.
Who are you?
-
@Polygeekery said in Today in Blakeyrat is always several years behind in every tech trend news...:
The heaters are PID controlled via the firmware on the board. In this case I would not have to worry about the board handling the voltage because I would use the 24V that normally powers the bed to control a MOSFET that would switch the higher voltage to the bed heater. Make sense?
What if the MOSFET short?
Usually a system has failsafes, like "too much heat for a dt -> full secure shutdown from the PSU, no mather what". Your hack can put failsafes out of game. hoping the failure mode for the extra PSU will do the needfull.
Maybe you need to care how to safely handle failure modes.
 3D bioprinting - Wikipedia
