Today in Blakeyrat is always several years behind in every tech trend news...
-
@Gribnit said in Today in Blakeyrat is always several years behind in every tech trend news...:
Selective permissivity to UV would be a good angle.
Is that even possible with thick opaque layers?
-
@Polygeekery said in Today in Blakeyrat is always several years behind in every tech trend news...:
@Gribnit said in Today in Blakeyrat is always several years behind in every tech trend news...:
Selective permissivity to UV would be a good angle.
Is that even possible with thick opaque layers?
Only if they are transparent to the crosslinking frequency after crosslinking, with peak absorption only during link. And you still need selective pigment.
-
@Gribnit I don't even know if you're just making shit up and trying to sound like you know what you're talking about or if you actually do know what you're talking about. I will assume that you're correct and just roll with it.
-
@Polygeekery said in Today in Blakeyrat is always several years behind in every tech trend news...:
@Gribnit I don't even know if you're just making shit up and trying to sound like you know what you're talking about or if you actually do know what you're talking about. I will assume that you're correct and just roll with it.
Somehow, I know my polymer chemistry.
-
@Polygeekery said in Today in Blakeyrat is always several years behind in every tech trend news...:
@Gribnit I don't even know if you're just making shit up and trying to sound like you know what you're talking about or if you actually do know what you're talking about. I will assume that you're correct and just roll with it.
I don't know what he said, but I assume exactly the opposite. I made the mistake of using dev tools to unhide his reply to my post, because I thought, unlikely as it seems, that he just might have something useful to contribute. Complete waste of time and effort. I won't bother doing that again.
-
@HardwareGeek said in Today in Blakeyrat is always several years behind in every tech trend news...:
@Polygeekery said in Today in Blakeyrat is always several years behind in every tech trend news...:
@Gribnit I don't even know if you're just making shit up and trying to sound like you know what you're talking about or if you actually do know what you're talking about. I will assume that you're correct and just roll with it.
I don't know what he said, but I assume exactly the opposite. I made the mistake of using dev tools to unhide his reply to my post, because I thought, unlikely as it seems, that he just might have something useful to contribute. Complete waste of time and effort. I won't bother doing that again.
A good chef tastes everything.
-
Dayum. Was going to order more black resin from Anycubic. Price is currently $50/kg, regularly $70. Also, buy 3 for the price of 2. Note: $50 does not satisfy that pricing; 2 @ $70 = $140, but 3 @ $50 = $150. It's close, but it's not 3 for the price of 2. And it says in big red letters on the very page with the discounted resin,

Cool. I have 3 identical bottles of resin in my cart.

Decide to buy it anyway; it's still a good price, even if their discount code doesn't work.
$50 shipping, and it may take up to 2 weeks to get here. Last time, shipping was free.
 if you think I'm going to pay as much for shipping as a bottle of resin.
I'm going to try MatterHackers resin at $28/kg with free shipping.
-
TIL about this online tool:
I had a model that would only render completely unmodified when imported to OpenSCAD, but obviously that's not what I want when I'm trying to edit the model for my own purposes. Sometimes Windows' built in 3D Builder can fix problems like that, but this time the fixed version still didn't work. MeshLab could probably do it, but there's a steep learning curve and I haven't quite figured out the workflow. This Formware one, just upload, wait a few moments for the queue and the process, and like magic it works. A+ would fix again
-
@hungrier said in Today in Blakeyrat is always several years behind in every tech trend news...:
Windows' built in 3D Builder
Totally normal thing for an OS to have
-
@HardwareGeek said in Today in Blakeyrat is always several years behind in every tech trend news...:
I'm going to try MatterHackers resin at $28/kg with free shipping.
Bought 2 kg. Arrived today; no crazy detours. I'm not quite out of the old, yet; I'll try it next time (after I change from the old I have in the printer now) I need black.
-
@HardwareGeek said in Today in Blakeyrat is always several years behind in every tech trend news...:
@HardwareGeek said in Today in Blakeyrat is always several years behind in every tech trend news...:
I'm going to try MatterHackers resin at $28/kg with free shipping.
Bought 2 kg. Arrived today; no crazy detours. I'm not quite out of the old, yet; I'll try it next time (after I change from the old I have in the printer now) I need black.
Common misconception. If you have 2 kilos of blonde or red leb, it's better than two of black.
-
I discovered something I need to design and print soon. The airbrush compressor I bought came with a little plastic holder for the airbrush when you need to put it down for a minute. However, it seems to be designed to fit their own airbrush, not mine, which has a tendency to fall out. Today, it fell out while I had it partially disassembled for cleaning. It landed on the needle and bent it. So I need to take measurements of my airbrush and design a holder to fit it properly. I'll probably have my son print it on his printer; PLA seems to be stronger than my resin, which is somewhat brittle. ABS would be even better, but he doesn't have any.
-
@HardwareGeek said in Today in Blakeyrat is always several years behind in every tech trend news...:
ABS would be even better, but he doesn't have any.
AIUI, ABS is also a lot harder to print. It needs higher temperatures on both the nozzle and print bed, may need an enclosure to prevent warping (maybe not in
 ), and it outgasses toxic fumes. PETG is a pretty good substitute, but for something like what you need PLA should be fine anyway
-
@hungrier Yeah, my son's printer is certainly capable of doing ABS; the biggest problem, and one we are not set up to deal with, is the fumes. And yes, PLA should be adequate. Resin would probably work, too, and it's well within the size my printer can do, but it's more brittle, and I have access to PLA, so
 .
.
-
@HardwareGeek said in Today in Blakeyrat is always several years behind in every tech trend news...:
@hungrier Yeah, my son's printer is certainly capable of doing ABS; the biggest problem, and one we are not set up to deal with, is the fumes. And yes, PLA should be adequate. Resin would probably work, too, and it's well within the size my printer can do, but it's more brittle, and I have access to PLA, so
.You'll need to print up an exhaust system.
-
Ah, the joys of printing teeny-tiny things in HO (1/87.1) scale. The supports are bigger than the things I'm trying to print.
I'm trying to print tiny people to make the train layout (if I ever actually build it) look like a world that's actually inhabited. However, I have lots of nicely-printed supports, supporting things like people with one leg or no arms — or failing to support vaguely people-shaped blobs of resin stuck to the bottom of the vat.
I noticed (after I printed, of course) that I had tolerance compensation enabled in the slicer. This is used in situations like two pieces that have to fit together — tab A into slot B sort of thing — because typically the tab will be oversized and the slot undersized (sometimes vice versa, although not in my experience), so they won't fit; tolerance compensation tells the software to print everything slightly undersized (or oversized) by a specified amount so the dimensions as-printed come out correct. But when things are so tiny they barely print at all, printing them undersized is not really helping.
I also considered increasing the exposure a bit, to cure each layer more fully to the previous layer, which (in theory, at least) should help make sure the objects print as solid pieces, at the possible sacrifice of some fine detail. However, I decided to reduce the layer thickness, instead. I've been using the default layer thickness of 50μm for everything, so far. This is my first go at anything other than the default; I reduced it to 30μm (the printer's minimum is 25μm). Of course, thinner layers means more layers, which means longer print time — increasing from ~3.5 hours to ~5 hours, in this case.
When each layer is printed, it sticks to the thin plastic (FEP) film that forms the bottom of the resin vat, and the printer has to peel this off the bottom of the vat after each layer so it can print the next one. I considered reducing the speed at which the print plate lifts, in order to make the peeling more gentle and reducing the likelihood of tearing the layers of the print apart, but this can drastically increase the print time, so I decided to leave it at the default for now, and see if the other changes are adequate to get a good print.
Also, I created separate profiles in the slicer software, with descriptive names, so I know which settings I'm using.
All this is after the first print, in which not only did nothing print correctly, but what did print was so tiny I could barely even see it. Everything was too small by an order of magnitude. Eventually, I realized why. I modeled the figures in Blender full-sized and scaled them by 1/87.1 when exporting the STL files. However, I was modeling at 1 Blender unit = 1 cm, but the slicer assumes 1 unit = 1 mm in the STL file. So, instead of scaling the STL file export by 1/87.1, I need to scale by 1/8.71. (It's not the first time I've run into the difference between Blender scale and slicer scale, but previously I'd been modeling building dimensions using as-printed rather than full-sized dimensions (e.g., walls ~35mm high rather than 10 feet), so the factor of 87.1 was already accounted for, and I was adjusting by a factor of 1000. After a few issues with exporting, I just made this adjustment in Blender, itself, rather than the export process, so I forgot I needed to make the (different, because cm) adjustment for working with the models of people.) However, for this print, rather than regenerate 20 separate STL files, I just scaled everything by 10x in the slicer.
But at least my first attempt at mixing custom-colored resin turned out ok. Not easily reproducible, but ok. I forgot to shake the bottles of pigment before starting to add them to the resin, so the first few drops (before I shook them) probably had less pigment than they would have had if I had done things correctly. Since I knew this batch could never be reproduced exactly, I didn't bother recording exactly how much I added, but roughly 10 drops magenta+12-ish drops yellow+1 drop cyan (to reduce the saturation and give more of a tan than bright orange ) in 100ml white resin gives an acceptable Caucasian skin color. (This is using the Monocure pigment kit with Anycubic plant-based resin.) I can't really declare it a complete success until I get a successful print, but it seems to be printing about the same as the Anycubic resin without other-brand pigment.
-
@HardwareGeek if you establish an appropriate gradient in the people resin you'll get minorities. Or tie-dye people.
-
Gradients aren't really possible, not very well or reliably, anyway, because the resin gets somewhat mixed by the raising and lowering of the build plate. A few layers of tie-dye might be possible, though.
I do intend to mix other colors of people resin, but I'm starting with Caucasian because we are the majority in (most parts of) this country, by something like 4:1. I'm not modeling (if I ever actually build the layout) any specific location, so there's no particular reason to deviate significantly from that ratio.
-
@HardwareGeek fair. Do consider tiny sledgehammers. Things go badly wrong from time to time with trains, and when they do colossal forces are involved.
-
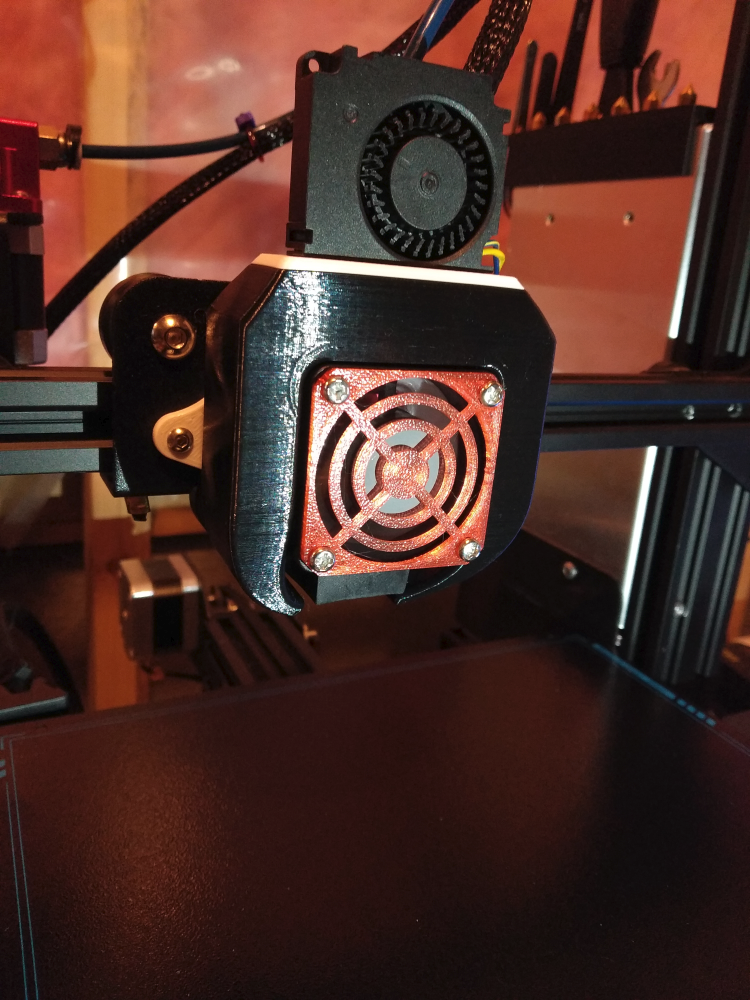
Status: Bought an inductive proximity sensor to begin my attempt at making a DIY bed tramming system. So far, it appears to work fine at 5v, but I haven't tested it for accuracy and repeatability. I'll probably cobble together some way to test it before doing anything else, but ultimately my goal is to design a mount for it integrated with the fan duct that I adapted from an existing design.
Speaking of which:
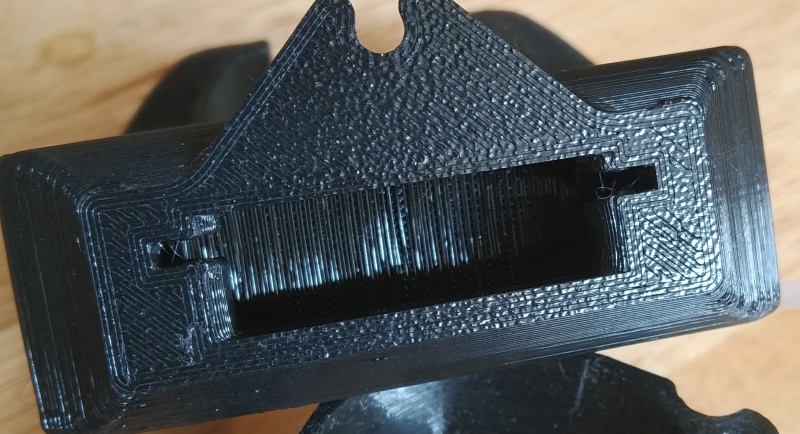
I found a printable fan duct that I liked, that used the stock Ender 3 fans. However, it had a couple problems:
- The slot for the part cooling fan at the top didn't fit my part cooling fan. I guess the original Ender 3 part fan had a slightly different retention mechanism.
- There was nowhere to put the wire from the heatsink fan, other than stretching it in front of the fan duct, which didn't look good.
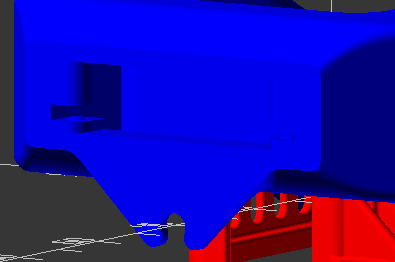
Here are the "notes" I took to guide me in my mod

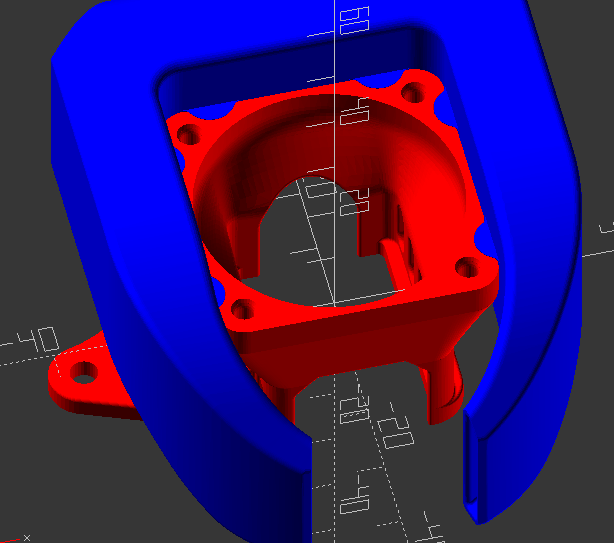
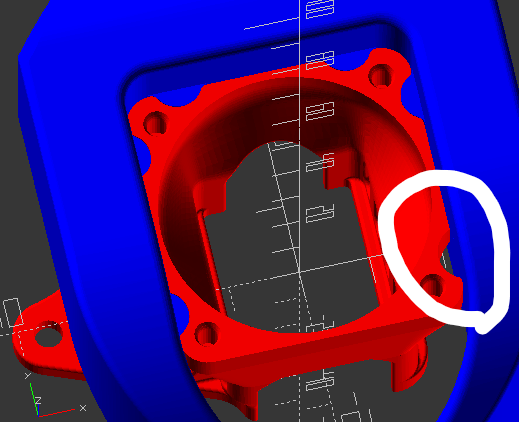
So, first thing I did was remove the indicated pin so that I could pass the wires through there. After dealing with some model integrity issues (I mentioned a web service
 that would pretty much automatically fix things like that - I found it while doing this), it was simple to do.
After that, I started designing my own fan interface so I could slot my fan into the thing. After a little bit of trying to do it from scratch, I realized that I could (literally and figuratively) cut corners to make it a lot easier on myself. So I cut out a tiny piece of the retention slot, reimported that bit and moved it by a couple mm, and that was that.
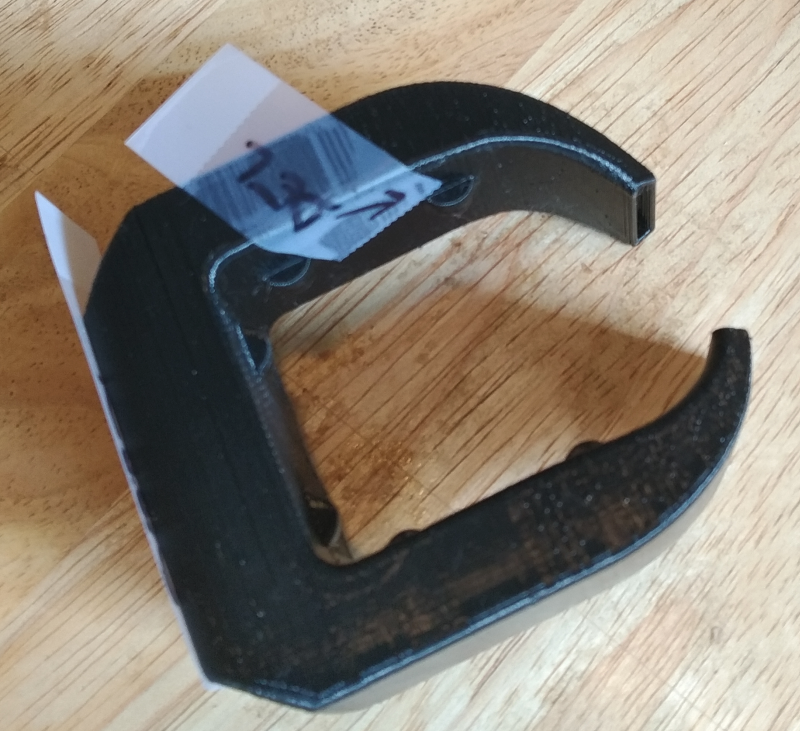
Before and after

And then I printed a fan grille in TPU, because why not?
-
@HardwareGeek Better, but still not good. The woman on the beach with a big, floppy hat has both legs and arms, although the arms are very anorexic. The guy taking pictures of her has arms and a blob that might be a camera. The dancing woman has part of her skirt (and maybe legs?), and the guy dancing with her appears to have printed ok. Some of the random people walking down the street (or wherever) printed ok and some didn't. The old woman sitting on a park bench feeding pigeons appears to be ok (without bench; that will be printed separately), and the guy napping in a porch chair also looks mostly ok, although the chair is very flimsy and he seems to be missing his beverage.
Other figures were less successful. The guy diving from a diving board is a blob dangling from a single support, with the diving board having failed completely. A boy and girl swimming, a man running, a woman sitting on the beach reading a book, and a toddler running around (also intended for the beach scene) are nothing more than blobs at the bottom of the resin vat.
It is possible to buy commercially-made figures such as these, but there is a limited assortment of what the people are doing and what they look like, limited even further by which ones you can actually find to buy. They're also very expensive, maybe $20–30 for a set of 4–6 people, if you can find them. If I can get them to print successfully, I can get 20 or more figures for < $1 worth of resin, and the appearance, clothing, and posing of the figures can be anything I want them to be (within limits; joints look wonky in extreme poses, which is something I can fix, or could if a warthog weren't in the way). I can print a lot of failures before it costs me more than buying the equivalent, if I could find similar figures.
-
@HardwareGeek said in Today in Blakeyrat is always several years behind in every tech trend news...:
@HardwareGeek Better, but still not good. The woman on the beach with a big, floppy hat has both legs and arms, although the arms are very anorexic. The guy taking pictures of her has arms and a blob that might be a camera. The dancing woman has part of her skirt (and maybe legs?), and the guy dancing with her appears to have printed ok. Some of the random people walking down the street (or wherever) printed ok and some didn't. The old woman sitting on a park bench feeding pigeons appears to be ok (without bench; that will be printed separately), and the guy napping in a porch chair also looks mostly ok, although the chair is very flimsy and he seems to be missing his beverage.
Other figures were less successful. The guy diving from a diving board is a blob dangling from a single support, with the diving board having failed completely.Maybe roll with it. The town has more than its share of Cronenbergs. Dark secrets.
-
@HardwareGeek I gave it one more go at fixing it in the slicer before going back and fixing the models for better printability, generating new STL files, and having to redo all the supports for the updated models. I turned on tolerance compensation again, but with a positive offset, so everything should print 50μm oversized (might be enough to fix the thin, fragile spots), and beefed up the supports for the more problematic figures. Started the printer and went to bed.
Got up this morning and ... nothing. No trace of failed print on the print surface. No blobs of failed print on the bottom of the vat. The screen said "print done", and the print surface was wet with liquid resin, but other than that, there was no sign that it had even tried; I might as well have forgotten to start it before I went to bed.
Trying again; we'll see what happens in about 5 hours.
Also, I'm really tired of fighting with ChiTuBox slicer, but that's for another post, later; I haven't had enough (any) caffeine to write that post right now.
-
@HardwareGeek Ok, I've had a couple more hours of sleep (thanks, public holiday) and caffeine; I'm ready to whine about ChiTuBox.
First, there's the problem common to all the slicer software I've tried so far, which I may have whined about previously (but I scrolled back a ways and don't see such a post). Second is a problem that seems to be specific to the current set of models I'm trying to print.
I hate the slicers' perspective view of the objects to print. Trying to move a particular thing you want to look at (for example, to attach a support to it, or to make sure it's not touching another object) to the center of the screen so you can see it and maybe zoom into it changes the angle from which you're looking at it, and trying to rotate it so you can see it from a different angle moves it sideways, usually off-screen, and closer or farther away.
Even more, I hate that I have no control over the view's center of rotation. I'm zoomed in on, say, a particular detail to which I want to add support, but my view is blocked by another support or part of the object itself, so I want to rotate it so I can see the detail without the other thing being in the way. But instead of rotating around the detail of interest, the view rotates around some arbitrary point, so that rotating the view makes the object fly off-screen. I have to zoom out, find the object, drag it back to the center of the view, and zoom in again so I can see the detail. The zoom isn't so much a zoom as moving the 3D camera forward, and the steps are rather big, so trying to zoom in too far often results in the object being invisible behind the camera or partially invisible behind the camera's near clipping plane.
Specific to this particular set of objects, ChiTuBox crashes very predictably, with almost 100% reliability. Like all the software I've tried, it has two modes. There's the add/delete/move/rotate/hollow/fix/slice/save/etc. models mode, and there's the add/delete/edit supports mode. And with this particular group of models, switching from support mode to main mode CTDs 100% of the time (almost; it surprised me by not crashing during the last mode change in the wee hours of this morning). It doesn't seem to be related at all to making changes in the support mode; it crashes even if I leave support mode without adding or changing any supports. Restarting the program after the crash results in a dialog "ChiTuBox did not shut down properly. Do you want to reload the last autosave file? Yes/No", or words to that effect. Except when it doesn't.
So, since this crash is so predictable, I developed a workflow.
- Select one (or more) individual model.
- Enter support mode.
- Edit supports (while fighting the UI that makes this harder than it should be).
- Wait about 5 minutes or so for the autosave to happen. (Note: There's no way to save while in support mode; the UI doesn't support it.) Make a mental note of what time I did the last edit, and check that the autosave file is more recent than that.
- Copy the autosave file, because once in a while the software seems to delete it so there's no file to load when restarting after the CTD.
- Switch back to the main mode. Crash happens.
- Restart ChiTuBox. Respond Yes to the "load autosave?" dialog.
- Check that the last edits are actually in the autosave.
- Manually save the .chitubox file (which defines what STL files are loaded, where they're positioned, the support structures, the slicing options, etc. — including, apparently, the actual STL geometry, because when I've changed an STL file and reloaded the .chitubox file that uses it, it still has the old STL geometry).
- Navigate to the right folder on the drive on which I want to save it, because the file save dialog opens in the AppData\Local\ChiTuBox folder that has the autosave file in it, and the dialog has no Recent feature.
- Give it a proper name, because the default save file name is __autosave__numbers.chitubox.
- Repeat until all necessary edits are done.
As you might guess, some of the steps were added to the workflow after discovering that sometimes there was no autosave file to load after the crash.

ETA: Also, Windows Explorer crashes frequently ever since I installed ChiTuBox. This happens fairly reliably just by clicking on a .stl file in Explorer. Not double-clicking to open ChiTuBox (which doesn't work, BTW; it opens ChiTuBox, but not the .stl file), just single-clicking and/or dragging. I finally figured out this seems to be related to trying to get an image to display in the preview pane. Turning off the preview pane seems to fix this, at least so far.
-
@HardwareGeek said in Today in Blakeyrat is always several years behind in every tech trend news...:
Trying again; we'll see what happens in about 5 hours.
Another complete failure. I rebooted the printer. It's also way hotter in my workshop than recommended for the resin (~40°C). I have A/C in there, but it's not really compatible with good ventilation (resin fumes) — it's completely ineffective when the air is being sucked out faster than it can cool it — so I closed the windows most of the way, turned on the A/C, and just abandoned the workshop to the fumes for a few hours. But I wouldn't expect that to cause the resin to fail to cure whatsoever, and it's not that much hotter than it's been during most of the other printing I've been doing. It's Texas in the summer; hot is the only temperature available.
Anyway, I'm trying one more time. If it fails again, apparently replacing the LCD is a thing that needs to be done fairly frequently in this type of printer. Maybe that's the next step. I don't know what the typical symptoms of LCD failure are, whether it's a gradual loss of individual pixels, or a sudden, catastrophic failure like this.
-
@HardwareGeek said in Today in Blakeyrat is always several years behind in every tech trend news...:
@HardwareGeek Ok, I've had a couple more hours of sleep (thanks, public holiday) and caffeine; I'm ready to whine about ChiTuBox.
First, there's the problem common to all the slicer software I've tried so far, which I may have whined about previously (but I scrolled back a ways and don't see such a post). Second is a problem that seems to be specific to the current set of models I'm trying to print.
I hate the slicers' perspective view of the objects to print. Trying to move a particular thing you want to look at (for example, to attach a support to it, or to make sure it's not touching another object) to the center of the screen so you can see it and maybe zoom into it changes the angle from which you're looking at it, and trying to rotate it so you can see it from a different angle moves it sideways, usually off-screen, and closer or farther away.
Even more, I hate that I have no control over the view's center of rotation. I'm zoomed in on, say, a particular detail to which I want to add support, but my view is blocked by another support or part of the object itself, so I want to rotate it so I can see the detail without the other thing being in the way. But instead of rotating around the detail of interest, the view rotates around some arbitrary point, so that rotating the view makes the object fly off-screen. I have to zoom out, find the object, drag it back to the center of the view, and zoom in again so I can see the detail. The zoom isn't so much a zoom as moving the 3D camera forward, and the steps are rather big, so trying to zoom in too far often results in the object being invisible behind the camera or partially invisible behind the camera's near clipping plane.
Specific to this particular set of objects, ChiTuBox crashes very predictably, with almost 100% reliability. Like all the software I've tried, it has two modes. There's the add/delete/move/rotate/hollow/fix/slice/save/etc. models mode, and there's the add/delete/edit supports mode. And with this particular group of models, switching from support mode to main mode CTDs 100% of the time (almost; it surprised me by not crashing during the last mode change in the wee hours of this morning). It doesn't seem to be related at all to making changes in the support mode; it crashes even if I leave support mode without adding or changing any supports. Restarting the program after the crash results in a dialog "ChiTuBox did not shut down properly. Do you want to reload the last autosave file? Yes/No", or words to that effect. Except when it doesn't.
So, since this crash is so predictable, I developed a workflow.
- Select one (or more) individual model.
- Enter support mode.
- Edit supports (while fighting the UI that makes this harder than it should be).
- Wait about 5 minutes or so for the autosave to happen. (Note: There's no way to save while in support mode; the UI doesn't support it.) Make a mental note of what time I did the last edit, and check that the autosave file is more recent than that.
- Copy the autosave file, because once in a while the software seems to delete it so there's no file to load when restarting after the CTD.
- Switch back to the main mode. Crash happens.
- Restart ChiTuBox. Respond Yes to the "load autosave?" dialog.
- Check that the last edits are actually in the autosave.
- Manually save the .chitubox file (which defines what STL files are loaded, where they're positioned, the support structures, the slicing options, etc. — including, apparently, the actual STL geometry, because when I've changed an STL file and reloaded the .chitubox file that uses it, it still has the old STL geometry).
- Navigate to the right folder on the drive on which I want to save it, because the file save dialog opens in the AppData\Local\ChiTuBox folder that has the autosave file in it, and the dialog has no Recent feature.
- Give it a proper name, because the default save file name is __autosave__numbers.chitubox.
- Repeat until all necessary edits are done.
As you might guess, some of the steps were added to the workflow after discovering that sometimes there was no autosave file to load after the crash.
ETA: Also, Windows Explorer crashes frequently ever since I installed ChiTuBox. This happens fairly reliably just by clicking on a .stl file in Explorer. Not double-clicking to open ChiTuBox (which doesn't work, BTW; it opens ChiTuBox, but not the .stl file), just single-clicking and/or dragging. I finally figured out this seems to be related to trying to get an image to display in the preview pane. Turning off the preview pane seems to fix this, at least so far.
This saga is gross, consider the Gross Sagas thread.
-
@HardwareGeek I just filed a service ticket with Anycubic. The final attempt started out good — maybe even a little too thick, but I can live with that — for about 170 layers (measured 5.15 mm with .030 mm layer thickness would give 171.67 layers) out of 1635 total. All the objects end with a perfectly clean, flat plane at that height. It's like it simply didn't expose the next layer at all (just like it apparently didn't expose any layers in the previous two attempts). Some unknown number of layers later, it must have resumed exposing at least some of the subsequent layers, because there were blobs of hardened resin stuck to the bottom of the vat.
Oddly, one of the misshapen blobs at the bottom of the vat had attached to it a fully-formed leg that must have printed before the layer 170 cutoff, and somehow become detached from its supports and stuck to the blob.
I ran the printer's built-in "detect" test, and it appears to pass. The entire LCD panel illuminates. I guess it's now wait and see what their tech support says. It's lunchtime in China now, so I might even have a reply by the time I get up
tomorrowtoday morning.
-
Some sort of random thought of the day about 3D printing, this kind of seems to be the right place to ask:
What is the longevity of 3D-printed stuff (I know, there are different types of plastic, so feel free to elaborate)?
The other day I broke one small piece of plastic from a random object that is decades old. As happens with plastic (especially if exposed to light), it had yellowed and become brittle. So I wondered, how long can you expect a 3D-printed piece of plastic to last?
-
@remi said in Today in Blakeyrat is always several years behind in every tech trend news...:
The other day I broke one small piece of plastic from a random object that is decades old.
Why would you do that?
-
@remi Unfortunately, I can't give you a good answer. As you noted, there are different kinds of plastic. I'd expect longevity of a 3D printed part would be similar to something made from the same kind of plastic by another manufacturing process, with the caveat that it may also depend on the stress the part is under and what direction the part was oriented when it was printed. 3D printed parts may be structurally weak in the direction of the layers, so if the person who printed it made a poor choice of orientation for a high-stress part, the lifetime may be very short indeed. But it's difficult to give a general answer, because it depends both on the kind of plastic (e.g., how well it withstands UV light) and the way it was printed (layer orientation and how well the layers bonded together).
Still, I'd be very interested in someone with more knowledge giving a more detailed answer, especially in regard to long-term UV exposure, and even more especially in regard to a comparison between UV-cured resins and the various FDM thermoplastics.
-
@HardwareGeek said in Today in Blakeyrat is always several years behind in every tech trend news...:
3D printed parts may be structurally weak in the direction of the layers, so if the person who printed it made a poor choice of orientation for a high-stress part, the lifetime may be very short indeed.
Need some tests - crush, shear, torque, and stretch.
-
@Gribnit The guy from CNC Kitchen has done exactly that, with many different materials. I don't know if he's ever done longevity tests, but I have seen anecdotes of 3D printed parts lasting for at least a couple years in outdoor conditions
-
@hungrier said in Today in Blakeyrat is always several years behind in every tech trend news...:
I have seen anecdotes of 3D printed parts lasting for at least a couple years in outdoor conditions
Probably, but it depends very much on the type of plastic and on whether there is any kind of protective coating (e.g., paint). PLA, for example, is definitely not recommended for extended UV exposure.
-
@HardwareGeek said in Today in Blakeyrat is always several years behind in every tech trend news...:
@hungrier said in Today in Blakeyrat is always several years behind in every tech trend news...:
I have seen anecdotes of 3D printed parts lasting for at least a couple years in outdoor conditions
Probably, but it depends very much on the type of plastic and on whether there is any kind of protective coating (e.g., paint). PLA, for example, is definitely not recommended for extended UV exposure.
At least you can swipe the radiation endurance numbers from existing uses for non-novel polymers.
-
My son just had his first experience with 21 hours of PLA spaghetti. The print apparently broke loose from the bed at some point fairly far along into the 21 hours, but at least a few hours from the end.
-
@HardwareGeek said in Today in Blakeyrat is always several years behind in every tech trend news...:
I'd expect longevity of a 3D printed part would be similar to something made from the same kind of plastic by another manufacturing process
That may be a very naive question, but... generally speaking, does mass-produced plastic gizmos use the same plastic as 3D printing? For some reason I have the idea that 3D printing uses a special kind of plastic that's not widely used in other, more industrial, manufacturing processes, but now that I think about it I don't know where this idea comes from...
layer orientation and how well the layers bonded together
That is the other aspect that I had in mind. I would expect the fact that 3D printed objects are made of layers, vs. truly moulded in one block, to have some impact on life span, but I have no idea whether it's significant (compared to... everything else that affects life span!).
-
@remi said in Today in Blakeyrat is always several years behind in every tech trend news...:
does mass-produced plastic gizmos use the same plastic as 3D printing? For some reason I have the idea that 3D printing uses a special kind of plastic that's not widely used in other, more industrial, manufacturing processes, but now that I think about it I don't know where this idea comes from...
From my very limited knowledge of the subject, the most commonly used plastics for FDM 3D printing are:
- PLA (Polylactic acid), aka "the one whose fumes don't smell too bad"
- ABS (Acrylonitrile butadiene styrene), aka "the one whose fumes smell nasty"
Both of these are also used for mass-produced injection-molded stuff. According to Wikipedia, PLA is used in disposable cutlery and consumer electronics. And lots of things are manufactured out of ABS, including Lego bricks.
I've also read about FDM 3D printing using PET (Polyethylene terephthalate), which is the stuff used for bottling beverages.
For other 3D printing technologies... I have no idea.
-
@Zerosquare Talked with an acquaintance that works with packaging materials. They were somewhat impressed with the use of PLA in 3d printing. Apparently it's a newer material in the context of traditional manufacturing and a bit more expensive (they mentioned considering it a bit hipster). Starting to make some inroads, though.
Advantages are that it's nicer to dispose of (in theory). Technically recyclable, but few places collect it separately. Biodegradeable under the right conditions. Burns without much weird byproducts.
-
@Zerosquare You got me to read a few links on Wiki about plastics.

If I read correctly, the most common, by far, plastics used in the industry are (variations of), roughly from more to less used, polyethylene (PE) (used for about anything...), polypropylene (PP) (also used for anything, but common in boxes and similar small objects), polyvinyl chloride (PVC) (pipes, window frames...), polyurethane (PU) (foams e.g. sponges), polyethylene terephthalate (PET) (bottles) and polystyrene (PS) (packaging but also CD cases etc.).
PLA/ABS is used in mass manufacturing, but overall much less than those (though indeed e.g. Lego bricks and some other common objects are made of ABS).
So I guess my idea that mass production doesn't use the same plastics wasn't totally off?
 to check which of the above are the less durable (the articles have too much information for me to see that at a glance), though I guess PVC, given some of its most visible applications as a building material is probably very durable and light-resistant. And my "random plastic object" that wasn't so durable was likely some form of PE or PP, since they're the most common ones. The PU page has a part about yellowing, but since the most common use seems to be foams, it's probably not what was my object. I could try and check the identifying mark but I've already thrown the thing away and
 (I like the symmetry of the previous paragraph start/end, as if the emoji was some sort of tag!)
-
@remi said in Today in Blakeyrat is always several years behind in every tech trend news...:
The PU page has a part about yellowing, but since the most common use seems to be foams, it's probably not what was my object.
Plastic yellowing can also be caused by bromine-based flame retardants. Interestingly, it's somewhat reversible: https://www.retr0bright.com/
-
Also, about aging, Lego bricks clearly yellow when exposed to light. I have some model built years ago and when I take it apart there is a clear contrast of colour between parts that were exposed or not. But as far as I can tell, Lego bricks don't become particularly brittle, or the opposed, soft, even decades later. There are still Lego bricks from when I was a child (
 ) and they look about as good as more recent ones.
So as far as the material itself is concerned (as opposed to how it's formed i.e. the layering), ABS seems pretty stable?
-
@remi Plastics can be broadly divided into two categories, thermoplastic and thermosetting.
Thermoplastic polymers soften at high temperatures and can then be molded or extruded. Any plastic used for FDM printing is, of course, a thermoplastic, since that's how FDM printing works (heating and extruding), and several examples have already been given.
Thermosetting plastics start as a liquid or soft solid and undergo irreversible polymerization on exposure to heat, UV light, and/or a chemical catalyst. Examples of these include epoxy, polyester resin, polyurethane, melamine, and silicone. Thermosetting polymers are used in resin 3D printing, which typically polymerizes the resin using UV light. (There are specialty resins that require specialized printers. These generally require sending your model to a printing service that has the specialized equipment.) Thermosetting plastics generally do not soften significantly on heating, eventually decomposing — possibly charring or burning — if heated sufficiently, although there are specialized epoxy and polyurethane polymers that are exceptions.
Which thermosetting polymers are used in 3D printing?
 Resin manufacturers seem to consider that proprietary information. Other than some manufacturers advertising their resins as being "epoxy free" (apparently, epoxy is responsible for some of the nastier resin fumes), and 3 manufacturers who make silicone resins (2 of which are available only as printing-as-a-service, because they require special heat-curing printers; only one is compatible with ordinary UV printers), I have no idea what sort of polymers are in typical 3D printing resin. It may be in MSDSs, but in my limited experience, manufacturers don't make those easy to find (not on their website, or if there's a link, it 404s).
-
@remi said in Today in Blakeyrat is always several years behind in every tech trend news...:
There are still Lego bricks from when I was a child (
) and they look about as good as more recent ones.And they still hurt just as much when you step on them.
-
@HardwareGeek said in Today in Blakeyrat is always several years behind in every tech trend news...:
It may be in MSDSs, but in my limited experience, manufacturers don't make those easy to find (not on their website, or if there's a link, it 404s).
Seems on par for something made by Microsoft.
Thanks for the info though. My answer to your post is only a joke because I don't have more to add, not because it wasn't interesting.
-
@cvi said in Today in Blakeyrat is always several years behind in every tech trend news...:
@Zerosquare Talked with an acquaintance that works with packaging materials. They were somewhat impressed with the use of PLA in 3d printing. Apparently it's a newer material in the context of traditional manufacturing and a bit more expensive (they mentioned considering it a bit hipster). Starting to make some inroads, though.
Advantages are that it's nicer to dispose of (in theory). Technically recyclable, but few places collect it separately. Biodegradeable under the right conditions. Burns without much weird byproducts.
It's spun sugar, then, is what you're telling me.
-
@Gribnit Cornstarch, actually
-
@hungrier said in Today in Blakeyrat is always several years behind in every tech trend news...:
@Gribnit Cornstarch, actually
Same thing.
-
I'm not really in the market for a new resin printer, but if I was, I'd be looking seriously at the Phrozen Sonic Mighty. I don't know much about it, except that it's more expensive than the Photon S I bought, but it has a significantly bigger print volume (125 x 200 x 220 mm vs 65 x 115 x 165 mm), which has been a source of considerable frustration for me, having to split models into multiple pieces to fit the printer. It also has finer Z resolution (10 μm minimum layer thickness vs 25 μm) and similar (52 μm vs 47 μm) X and Y resolution. MatterHackers has it on sale currently for $100 off. They also have some other high-end printers discounted by >$1000, but I'm definitely not in the market for anything expensive enough to be discounted that much.


Meanwhile, the printing problem I filed the ticket with Anycubic for (complete failure to print some or all layers) has been — not resolved, but has not recurred — so there isn't really anything further their customer service can do. They had me try some things that would plausibly affect print quality, but not the complete failure I experienced. So
.I'm getting good prints of my teeny-tiny people for my (hypothetical) train layout fairly reliably (except for some clothing to which I neglected to add a "solidify" modifier, so it's trying to print infinitesimally-thin geometry), but it involves so many supports that freeing the print from its supports almost amounts to carving the model out of solid plastic. This, as you might expect, is not 100% successful; railroading is a dangerous occupation, and my train town is populated with a lot of amputees.
 Anyway, I need to reprint some of the amputees, so I have tweaked some of the supports so that they (I hope) don't fuse into a solid block of plastic that can't be separated from the object they're supporting but still (I hope) give adequate support to the mass of the torso. Also, added/increased thickness of clothing where necessary.
-
Recently I decided to upgrade the hotend on my Ender 3. At first I just wanted to replace the heatbreak with a bi-metal one, but I found that despite my attempts to preserve the original one, the whole thing (heat block, throat and heastink) was all gunked up with crap. So
instead of cleaning it I just bought a cheap assembly off Amazon. Turns out that was a bad move, as the tolerances on it were so shit that even after hot tightening everything, it still leaked molten plastic all over the place. I wasn't even able to finish a first layer leveling test, as the molten shit hung down below the nozzle.So I thought fuckit, might as well get a fancy new hotend assembly, and got a Phaetus Dragonfly. I installed it last night, and so far it seems to work great, but I noticed that the heatblock has a bit of a larger space below the end of the heatbreak, so I need to use nozzles with a longer stem in order to avoid leaving a 1-2 mm gap inside the heatblock that would surely get clogged up. So much for buying a bunch of replacement nozzles
-
I did something today that I've never done before; I backed a Kickstarter project. It's already funded >2000% of it's fundraising goal, and it's an established company with a good reputation for making good printers, so they're pretty much certain to deliver the product they're developing. So, effectively, I just bought another printer at a pre-release discount.
The print volume is slightly smaller than my current printer, but despite having somewhat lower X/Y resolution, it's supposed to give sharper fine detail. Also, faster printing (per layer, but more, thinner layers). And lower maintenance cost. The LCD screen in my printer has a lifetime of ~2000 hours. At $70 a pop, that's $700 worth of maintenance in the ~20000 hour lifetime of the DLP mechanism in the new printer.
And to go back to the lighting topic, with the arrival of two Arduino Unos day-before-yesterday, I now have everything I need to make pretty lights for my model train layout. Except the layout. (And some holders to hold the fiber-optics in front of the LEDs, but those are trivial to print.)
 Free online stl repair tool