3D printing guide for n00bs
-
So I have been considering a guide for n00bs to 3D printing. Those who want to get into 3D printing, but have been overwhelmed by the amount of options and the depth of material on the subject. This is my endeavor at the subject.
 "What makes you think you are qualified to write such a thing?"
Well,

along with a less particular set of deficiencies. When I am interested in something, I dive in headlong and immerse myself in the subject matter. If I am not interested then I am incapable of giving a fuck less about it. 3D printing has piqued my interest. I also did not get into 3D printing all that long ago so my mistakes and missteps are still fresh in my mind. Since I started on this journey I have explored several different avenues for 3D printing and can give fairly good advice to the different areas a person might want to pursue.
So, knowing that this will likely end up in a fairly long thread I am going to consolidate all of my info on the subject into this post. I will add and edit it to expand on the subject where applicable and add posts to the end to denote my edits and additions. I am going to do my best to give good overall recommendations and make this a sort of "Choose your own adventure" sort of thing. Between iterations I will do my best to remember to use
<del></del> and/or <ins></ins>To show what has been added. Make sense? Good deal. Let's continue.
So you're considering getting into 3D printing, but there are so many options and models and you do not know where to begin?
Are you flush with cash, don't like tinkering and fucking with things and learning and just want to get down to it? Get a Prusa MK3S and be done with it. You can stop here.
Do you want to start out at a more moderate budget and like to fucking with things, learn how it all works and like tinkering? You're my kind of people. Read on.
If you're not wanting to make intricately detailed miniatures, then FDM is for you and the best recommendation I can give is to buy an Ender3 Pro.
$236 as of 5/9/2021
It is an amazing deal. At this point in the hobby I have several Ender3 Pros, two Prusa MK3S's, a Longer LK4 and an evergrowing collection of self-built 3D printers including two of my own design in the works. Beginners who like to tinker and don't want to spend $1,000 should buy the Ender3 Pro. No question.
It is an amazing value for money, and it will print common materials 85% as well as the Prusa printers at 1/4 the cost. Out of the box the Prusa will print flexibles and PETG significantly better than the Ender3, but for PLA and ABS (on most models) most people would never be able to tell the difference. With some tinkering and DIYing the Ender3's will print as well or better than the Prusa's at less than half the cost.
So what are the differences between the Ender3 and Prusa MK3S?
- Stepper drivers (the Prusa has TMC5130 silent stepper drivers with a lot more features, the Ender3 has A4988 drivers which are noisy and introduce artifacts in to prints in some conditions
- Single Z axis vs double Z axis, but this is not a big issue at 220mm Y-axis (235mm when upgraded)
- The Ender3 gives you a 220X220X250 build volume, the Prusa is 250X210X210mm, which is sort of a wash. The Prusa will print longer models, the Ender3 will print taller models. If I had to award a point, I would give the Prusa 1/2 point. You will probably rarely print the full height of your Z axis, but a bit more length or width can be very helpful. But the first upgrade I would recommend for the Ender3 brings you to 235X235X250mm.
- The Prusa printer has a really good direct drive extruder, and the Ender3 uses a Bowden style extruder with shitty gears which wear out quickly and honestly the whole extruder design on the Ender3 is pretty shit but it is very cheap and easy to upgrade. The stock Ender3 extruder assembly will work adequately for quite a while so don't sweat it too much.
- The Prusa printer uses an excellent E3D V6 all-metal hotend and the Ender3 uses a MK8/MK10 type of PTFE lined hotend. The all-metal hotend will print at much higher temperatures without degrading or killing your pet birds. The E3D V6 nozzles are also designed much better and will generally give a cleaner print in most materials, but the MK type nozzles will print PETG significantly better because they are more pointed and are less prone to gumming up with PETG which is extremely sticky. That being said, the PTFE lined hotend works well enough and will print all common materials (PLA, ABS, PETG, TPU, HIPS, etc.) just fine and since PTFE lined hotends are less prone to jamming if you over-retract they are better suited for beginners.
- The Prusa uses linear bearings and the Ender3 uses V-slot extrusions and rollers. This is not a significant difference. Both are very adequate and very roughly equivalent. You will hear people extoll the virtues of linear rails. I think based on my experience that this is bullshit. One thing that Prusa did very right and others have led the lead on is allowing some play and flexibility on motion control. This allows a little bit of ability for the printer itself to flex and prevent tight tolerances on linear motion introducing noise into the print.
Watch this for an expansion on the subject:
https://www.youtube.com/watch?v=J_RcgixLbAI
I agree with him 100% and shortly after building my first printer with linear rails I ended up redoing it to use linear bearings.
Those are the biggies. Obviously there are a ton of other differences. Another biggie is that the Prusa printer comes with a slicer that has amazing profiles tailored to the printer and materials that will virtually guarantee good prints. This is good and bad. If you just order the Prusa and use their built-in print profiles you are guaranteed acceptable prints but you have no idea how you got there. I am a tinkerer. I like to know how things work. So this is not necessarily a plus for me. In most instances. But it can be.
I'm not knocking Prusa. They are doing their best to democratize 3D printing, and their printers are amazing and do awesome prints. They are worth the money, unless you like to tinker. Once you tinker with a Prusa you can throw the profiles out the window and you have to tune them on your own.
Okay, moving on.
So you like tinkering and you are going to buy an Ender3 Pro. What should you get with them? What do you need to order at the same time?
- Filament
That's good to start. Don't forget this. I think they only come with ~100g of white filament, which is just enough to print 1-2 of the test models that come with the printer. If you want to print anything else you will need more filament. I would suggest ordering a multi-pack of PLA. You will go through it quicker than you realize.
That is a pretty good option that gives you four colors to print. If you don't want colorful then order a few kg of black. It is what I use most.
-
Added two more differences between the Prusa and Ender3, see insert tags.
-
Getting started with your new printer
So, your printer has been delivered. Follow the assembly instructions, they're fairly simple machines controlled by pretty clever firmware. Don't be afraid of it. I remember assembling my first printer and thinking that everything looked super complicated and wondering how easy it would actually be to get the hang of. The answer is: Very.
Don't get me wrong, you are going to fuckup some things. You will have prints fail. But for now keep everything on easy mode and once your printer is assembled you are going to want to heat the hotend to 200-215C and the bed to 60C and level your bed. This is easily the most important part of 3D printing. If you do not get this right your print will fail or you will ruin your nice new BuildTak surface. But it is pretty easy. The most important thing is to always level the bed when the machine is up to temperature. As everything heats up, it moves on you. Like, a lot more than you would think. I remember that when I installed my first SKR board and flashed my own Marlin config to said board, I was leveling my bed for the first print and I kept chasing it around and around and around and it never did get level. Then I realized that the default Marlin config has a short timeout on the heaters that shuts them off after just a couple of minutes of inactivity. As it cooled everything kept moving and I kept adjusting and it really got annoying, but it drove in my head the change in spatial relationships as things changed temperature on the printer.
So, bring everything up to temperature and let it stabilize for a minute or so. Home all your axis, disable your steppers and then manually move the print head over each leveling screw and adjust it until a sheet of copier paper has a little bit of resistance. Not too much. That was a mistake I made early on. If it is too close then your extruder tries to push out enough filament for a 0.2mm layer but you might only have a 0.05mm gap and that jacks your nozzle pressure way up. Your saving grace is that the stock Ender3 extruder is pretty shit, so it is incapable of doing so. But you will grind away at your filament and it's just not a good idea. When you have it properly leveled you should feel a slight resistance and should be able to fairly easily move the paper back and forth under the nozzle. You want to work your way around the bed several times, checking level at each point along the way and only consider it "level" when you can check each of the four spots without having to make another adjustment. If you can make a lap around the bed and it stays stable, you're good.
Load up some filament, pop in the SD card supplied with the printer and start one of the pre-sliced test prints. A short while later you should have a nifty dog figurine or whatever.
Once your print is done have a beer to celebrate. Or, if you are one of our Mormon friends.....have a glass of water or something. I have no clue what they do to celebrate.
One note on loading filament: The end of the filament only ever belongs in three places. Firmly gripped in your hand, in your extruder, or threaded through the retainer holes on the spool. If the end gets away from you it will bird's nest on the spool and will always be a source of potential problems until that spool is gone. If it does get away from you, keep tension on it and unwrap several rounds from the spool until you are fairly certain there are no tangles and then wind it back on the spool. If there is a tangle it will prevent the filament from feeding and ruin a print so always keep a good hold on it if the end is loose.
Slicing and printing your first model
You will see a lot of debate and fanboyism for each of the various slicers. But there are two that make up almost all of the market share. Cura and Prusaslicer. Both have their benefits and drawbacks. I am pretty partial to Prusaslicer because it gives you the most control but that also gives you the most opportunities to do something idiotic. But Prusaslicer does not have "tree supports". All supports in Prusaslicer have to go straight up with no branching or deviation from vertical. Cura has excellent tree supports, but I don't think that it slices models nearly as well. Plus, I really hate how their slicer settings are laid out as one gigantic vertical column with dropdowns for each category. With Prusaslicer it is laid out in different pages for each logical category of settings. For new users, I would probably stick with Cura. But don't use the version that comes on the SD card. It is probably a release from several years ago and as such is missing all of the features and bugfixes from subsequent versions.
Speaking of Cura, you are going to hate its installer. It installs into Program Files in a directory that includes the version number. Whenever you update Cura it uninstalls the older version and installs the new version, in a new directory, with the new version number. Which means that if you put a shortcut on your taskbar every update breaks that shortcut and leaves you with this bullshit:

The nifty white folder denoting a broken link. Annoying.
But anyway, download and install Cura and keep everything on easy mode for now, do not expose any settings that do not come visible by default and don't fuck with anything. At least for now. If you go dicking with settings before you know what they do you will likely waste time and filament. Stick with defaults. Pick something off of Thingiverse or wherever, download the files (Pro tip: You can append /zip to any Thing page and download the full zip file, handy for not having to disable your adblocker to get the download to work), extract the files and drag them right in to the slicer window. Slice it with all default settings on a 0.2mm layer height and if you have any overhangs on the model you may want to turn on supports. Always keep in mind that 3D printers cannot print in midair......well, they can sometimes. For now, just use supports.
Now, I guess is as good a time as any to discuss print orientation. Let's use this model from Thingiverse:
 Shelf Bracket - Topology Optimization by mosertim001
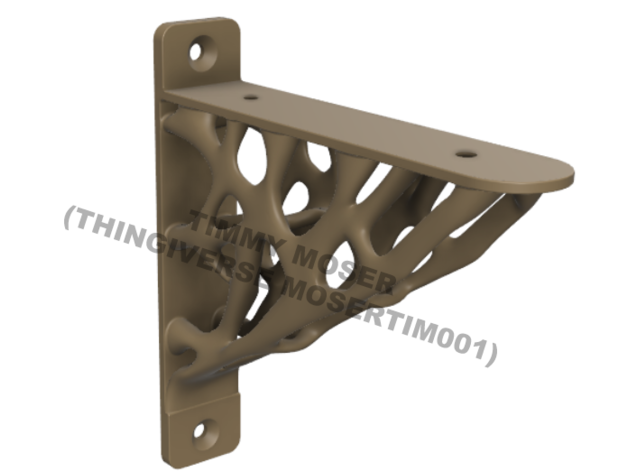
**UPDATE 23 Feb 2023*** I apologize for my watermark on the images. Numerous home decor companies and sellers on etsy have stole my images and .stl files which were created for you all to enjoy. **UPDATE 30 June 2021*** Added flush design that is 126mm long. See 30 April update for details. *I am...
If I drag it straight in to Cura it is oriented as such:
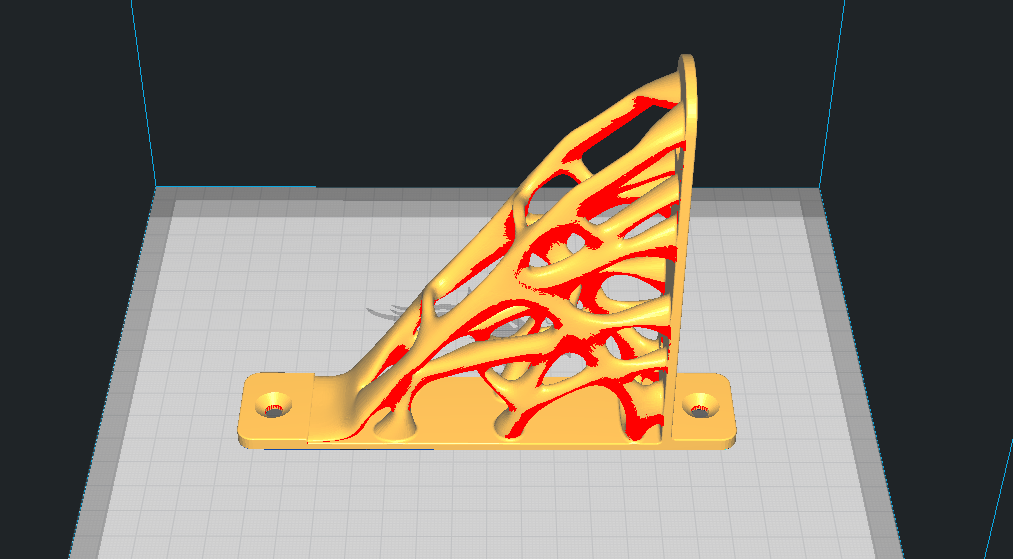
Now that is probably about as good as you are going to get on a compromise for print orientation. But it is certainly a compromise. When you affix the bracket to the wall the forces will generally be in this direction:
That isn't great, because your forces are aligned along the layer lines. Layer lines are much like woodgrain and your part will be strongest when force is applied perpendicular to the layer lines.
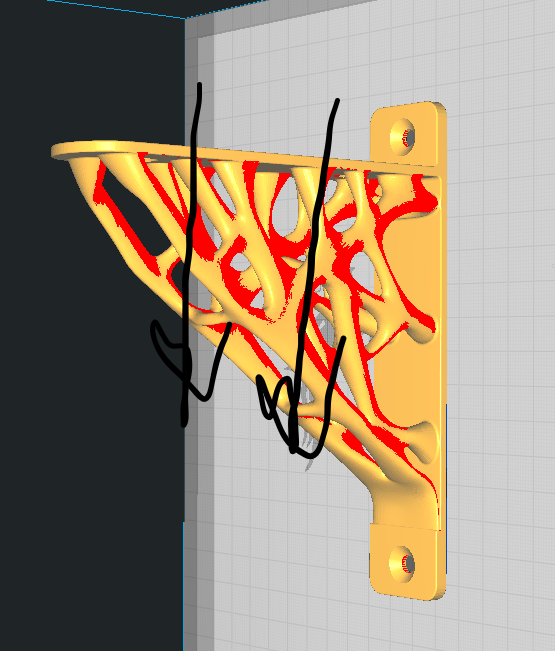
It might be better to print it in this orientation:
But then you will end up with a shitload of supports under the bracket arm and the tabs that screw it to the wall would be brittle and want to snap off if you overtightened the screws because of layer line orientation.
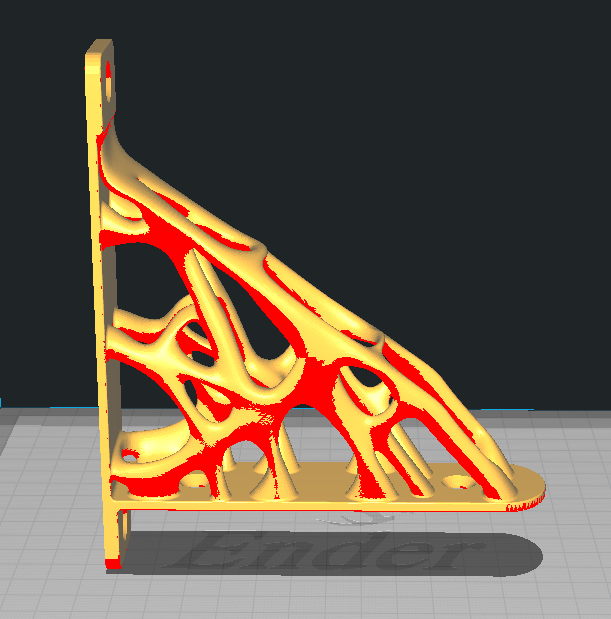
So really, the strongest orientation for all purposes would be this one:
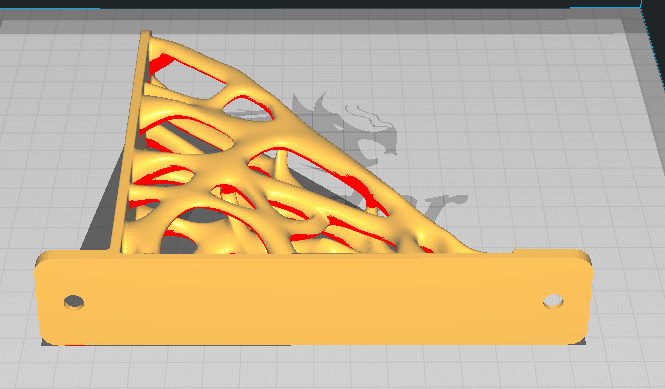
But if you do that then your printer will either try to print in midair a lot, or you would end up with a ton of supports in areas where they would be hard to remove. So the best orientation is the one that it imported in, but it is a compromise of strength in the direction that forces would be applied and the amount of supports needed or not needed. If you print it in the original orientation no supports should be needed at all. As a general rule 3D printers can build out at a 45-50 degree angle without needing supports. Plus, that particular model has been topology optimized so layer lines and layer adhesion should be a fairly moot point.
In general, the orientation it imports in should be correct. But that is only if the person who made the model and exported the STLs knows
 they are doing. They're usually correct, but watch out for the outliers. In Cura if you click on a model to select it and then select the third toolbar item from the top one of the options is:
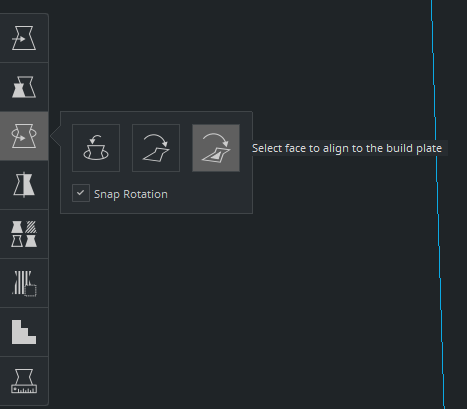
You can use that to easily orient your models. When I first started I kept manually rotating models, because I am an idiot that doesn't read. The one step align face to build plate was a huge aggravation saver.
So you've picked something cool to print, you sliced it with Cura, now save it to a SD card and pop that in your printer. Preheat everything like before, home all axis and check your level again. You will want to do this before every single print until you get the hang of things. After a while it seems like the printer gets settled/worn in and you should get a feel for how often you need to level. But for now check it every time. The one time you don't your print either won't stick because there is not enough first layer squish or you will gouge lines in your BuildTak and ruin it. Trust me on this.
Side note: When you get started you might want to keep a spreadsheet or some other method of notes about how much you have used off of each spool. When you slice a model it will tell you roughly how much filament that it will use and should be accurate within a couple of percent.

Good enough for our needs right now. Keep track of this as best you can so you know approximately how much filament is left on each spool. Then you can be fairly certain that you will have enough filament for each print when you start it. You do not currently have any filament runout detection so the printer has no idea if it is extruding or just going through the motions and doing nothing. I would also suggest getting a small scale to keep around your 3D printer and as you finish a brand of filament weigh the empty spool and keep notes of that. If you have an empty spool weight for that brand you can weigh a partial spool and get a good estimate of just how much filament is left.
Future place for spare parts
Future place for suggested upgrades
-
This post is deleted!
-
Okay, so what spare parts would one need? Everything has wear parts.
Well, there are considerations. Do you know how I have mentioned that the Ender3 stock extruder is crap? Well, here is where you have a choice to make.
The stock extruder has a shitty feed mechanism, with shitty gears, and a shitty tension spring, and the tension arm tends to crack (I have had two of them crack and caused prints to fail). The extruder gear is especially shit. It is a flat gear that has minimal engagement on the filament, and it is made from brass. I bet I could come up with 3-4 of them from my parts bin that have had the teeth flattened just from normal usage. And when the teeth are flattened they have basically zero grip to push the filament.
So, choose your own adventure time.
*#1, short-term cheapest route is to order some replacement gears and swap them out when you see the drive gear start to get grooves worn in it. IMHO, this is a fool's errand because they wear our very quickly. If I were to hazard a guess I would put it at less than 80-100 hours of print time before there is noticeable wear and verging on failure. In a short period of time you would end up with enough expense to justify the next step up the ladder. But if you want to go this route, here ya go:
But those really are shit. They are OEM. Total shit.
Next rung up the ladder, same gear design but in stainless steel. Better wear resistance, but still a flat design and still the same shit extruder design. (But as I said, it does work and work well enough for entry level usage):
Price per piece is cheaper. At the very least, go for stainless steel.
But, for not much more you can make a gigantic leap forward in extruder design. Like, Model T to modern economy sedan levels of leap in technology:
Seriously, it is a quantum leap in capability. It is dual drive, meaning that it has two gears that mesh together and drive the filament from both sides. The extruder gears are also hobbed to roughly the filament diameter so they grip the filament up the sides. Probably nearly an order of magnitude more grip on the filament. In addition it comes with a better spring that can exert more force, the whole thing is made from aluminum (so it won't crack like the injection molded OEM part does) and because of its design it has a higher step count per millimeter of extruded filament. This gets you more effective resolution on your e-steps.
So what does this mean? Okay, your stock Ender3 extruder has to move ~90-95 steps for every millimeter of filament extruded. This model is in the ~140-150 step/mm range. Let's say your e-steps are off by 1 step/mm on each one fromperfect extrusion volume. The one with the higher steps per mm will be 38% closer to precise volumetric extrusion than the other, even though they are off by the same number of steps per mm. (I think I did that math correctly. PRs accepted, and I am happy to go over the math with anyone.)
The upgraded dual gear extruder also has a much more constrained filament path which means you will have more success printing flexible filaments. But, in all honesty, I probably wouldn't dabble in flexibles too much unless you to go direct drive.
Bottom line, for $15 order that extruder and when your stock extruder wears out, swap it in. It is super easy. Four screws and then an e-step correction via serial terminal and you are good to go.
But you made it seem like there is another option?
I did. If you want to go the drect drive route fairly early, get a Bondtech BMG or similar clone. Same basic drive architecture, but with a 3:1 gear reduction. But if you aren't going to go direct drive early on then I would probably stick with the one linked above. But if you think you will go to direct drive pretty early, maybe save the $15 and get a BMG clone:
I have ordered that exact one a couple of times and zero issues. My first one has hundreds of hours of print time on it. Proof:
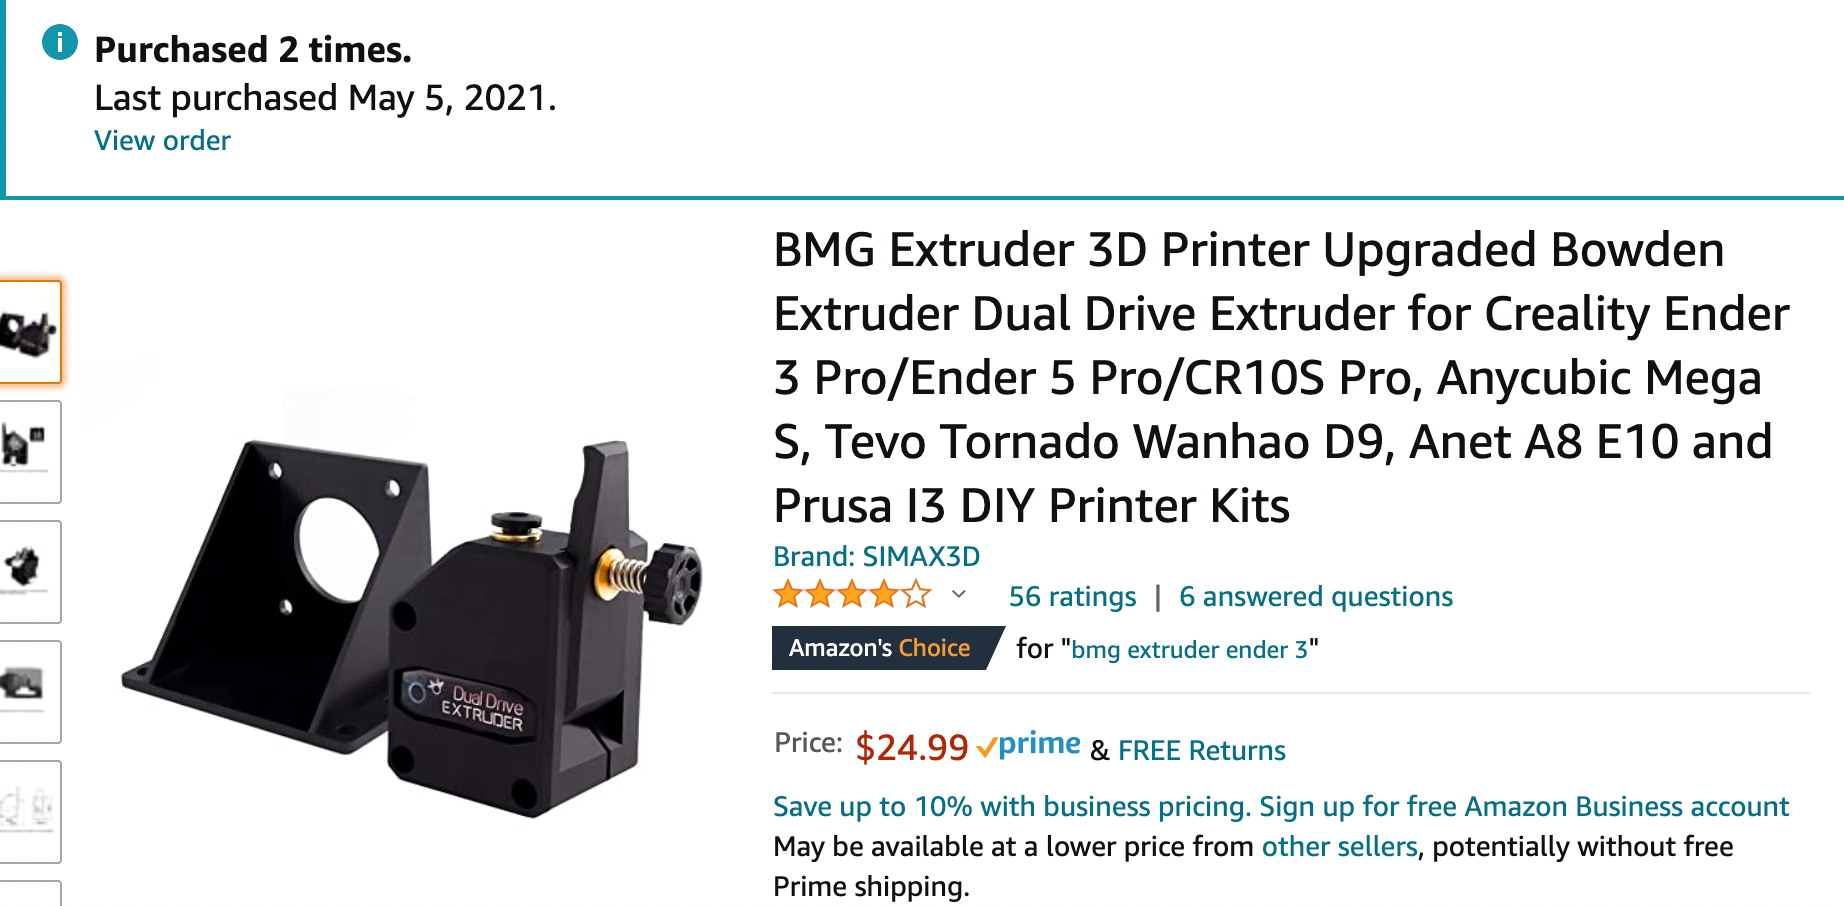
But, seriously, only get that if you want to go direct drive pretty soon. The reason being is that because of its 3:1 gear reduction it has more than enough pushing force to pop all of your Bowden connectors apart if there is a jam, clog, or you level your bed too close to the build surface. Speaking from experience here. It makes a gigantic bird's nest of filament that is unmelted but unsalvageable.
Okay, so other spare parts:
- nozzles (with the MK8/MK10 design just order a cheap variety pack of whatever you can get inexpensively. Make sure you order a variety of sizes. You can save a ton of time on some prints by using larger nozzles)
- pneumatic connectors (the thing that @hungrier was missing). When I was running Bowden setups I went through maybe a half dozen of them. They are cheap and if they fail you are up a narrow moving body of excrement with no means of conveyance.
- build surfaces. The stock BuildTak like Ender3 build surface is good enough to get started, and depending on your level of carefulness and will last between a few minutes or a few weeks. But they do wear out. Don't order an OEM replacement. Get one of these:
Maybe order two. If you have a backup then your original will last forever. If you don't, and that is your only build surface then you will crash a hot nozzle into it within a few days and scratch it all to hell and ruin it. Better to have it and not need it than need it and not have it.
Really, honestly, that should cover you for spare parts for a stock printer. But since they are cheap it probably wouldn't hurt to pick up some PTFE tubing, a heater cartridge, silicone socks for your heater block and some thermistors. If you have a semi-catastrophic failure that runs quite a while without you realizing it there is a good chance that a good chunk of your hotend below the heatbreak will be wrecked. Plus, the PTFE tubing does wear out over time. Capricorn tubing is the really good stuff, but if you order it do not get the close tolerance version. Get the normal vanilla stuff. The close tolerance stuff might help you lower your retraction distance, but that comes with the compromise of increased likelihood of jams. TINSTAAFL
-
Reserved
-
Reserved
-
Reserved
-
Reserved
-
Reserved
-
Reserved
-
Reserved
-
Reserved
-
Reserved
-
Reserved
-
Reserved
-
@Polygeekery said in 3D printing guide for n00bs:
Reserved
You are not the sort of person I would generally consider to be "reserved".
-
@HardwareGeek @Gribnit actually had a good idea to reserve several posts for later expansion and to make it sort of chapter like. Broken clocks and all that.
-
-
I don't think I'll get into 3D printing any time soon, if ever, but I just wanted to say
reservedthank you for this. It should be an interesting read.
-
@Polygeekery said in 3D printing guide for n00bs:
had a good idea
Eh, I might have thought it was a bad idea. You never know.
-
@Gąska said in 3D printing guide for n00bs:
@Polygeekery said in 3D printing guide for n00bs:
Reserved
Status: Sudden 2000s nostalgia.
 UNDER CONSTRUCTION
 eeeeeeeeent weedleweedleweedleweedleweedle bzzrt bong bong bong hisshisshiss
-
@Polygeekery said in 3D printing guide for n00bs:
Reserved
Doesn't nodebb have a time limit after which you can't edit your own posts anymore?
-
@PleegWat said in 3D printing guide for n00bs:
@Polygeekery said in 3D printing guide for n00bs:
Reserved
Doesn't nodebb have a time limit after which you can't edit your own posts anymore?
Is that after the last edit, or from the creation?
ReservedReserved2
-
@PleegWat said in 3D printing guide for n00bs:
@Polygeekery said in 3D printing guide for n00bs:
Reserved
Doesn't nodebb have a time limit after which you can't edit your own posts anymore?
-
@Polygeekery said in 3D printing guide for n00bs:
The most important thing is to always level the bed when the machine is up to temperature. As everything heats up, it moves on you. Like, a lot more than you would think. I remember that when I installed my first SKR board and flashed my own Marlin config to said board, I was leveling my bed for the first print and I kept chasing it around and around and around and it never did get level.
Here's another rather big plus for the Prusa: Automatic bed leveling. It now has 7x7 and 9x9 leveling patterns.
Plus, you can always install some sturdy steel springs and then use the data from the 9x9 leveling process to get your bed level deviation below 0.1 mm on each axis.
-
@boomzilla said in 3D printing guide for n00bs:
@PleegWat said in 3D printing guide for n00bs:
@Polygeekery said in 3D printing guide for n00bs:
Reserved
Doesn't nodebb have a time limit after which you can't edit your own posts anymore?
@Polygeekery better get cracking then
-
@Rhywden said in 3D printing guide for n00bs:
Plus, you can always install some sturdy steel springs and then use the data from the 9x9 levelling process to get your bed level deviation below 0.1 mm on each axis.
There's more than one way to skin that particular cat.
https://www.youtube.com/watch?v=qRbMOfMy-MA
Basically you add nylock nuts, nylon washers, etc. and you can dial in bed level very close and lock it down solid. There is also a plugin for Octoprint that tells you which screws to turn and by how much along with giving you a visualization of the bed level. Pretty spiffy.
-
@Gribnit said in 3D printing guide for n00bs:
@Gąska said in 3D printing guide for n00bs:
@Polygeekery said in 3D printing guide for n00bs:
Reserved
Status: Sudden 2000s nostalgia.
UNDER CONSTRUCTION eeeeeeeeent weedleweedleweedleweedleweedle bzzrt bong bong bong hisshisshiss
He didn't say 90s
-
@Polygeekery said in 3D printing guide for n00bs:
the best recommendation I can give is to buy an Ender3 Pro.
$236 as of 5/9/2021
Having just bought this exact printer (same seller, same product code, just from Amazon.ca) I can say that not only does the US get a better deal on the base price, but the promos currently active are better as well. 50% off filament! If I had that I'd've bought it right away (and it would've reminded me to buy it in the same order rather than spacing on it and having to order it separately)
-
@Rhywden said in 3D printing guide for n00bs:
Here's another rather big plus for the Prusa: Automatic bed leveling. It now has 7x7 and 9x9 levelling patterns.
Yeah, but you can add ABL to any printer. I also tend to prefer the BLTouch for bed leveling. It will level any print surface and is not dependent on metal or magnets. Also, with Unified Bed Leveling on Marlin you can probe a 10x10 mesh and store that to EEPROM and then tilt the mesh with a 3 point probe before each print. The larger the number of mesh points the longer it takes to run the leveling sequence. I've also not noticed a 9x9 option on the Prusa, only 7x7. Are you sure you are not mistaking the 3x3=9 points for 9x9?
But wait, there's more. The Prusa printers are designed to level on a 3x3 mesh and if you do not hit the designated spots for homing the magnets that retain the bed can throw off your measurements by 80-100 micron. Supposedly they can compensate for this in firmware, but it seems there would only be so much you could do in firmware when dealing with such variables and unknowns.

Unified Bed Leveling is one feature that I really like about Marlin and something that makes me reluctant to change from it to other firmwares. It is a pretty significant cumulative time savings with negligible decrease in accuracy.
I should time 3-point leveling, 3x3 and 7x7 to see how long each takes. I suppose it is possible that it actually doesn't take that long to do the others and it may have just seemed so because I am an impatient prick.
-
@Polygeekery said in 3D printing guide for n00bs:
time 3-point leveling
23 seconds for 3-point leveling to tilt the mesh.
Major annoyance of Marlin: You have to recompile and reflash the firmware to make any changes at all. With Klipper, Repetier, RepRap you just change a config file and reboot the printer.
-
@Polygeekery said in 3D printing guide for n00bs:
You have to recompile and reflash the firmware to make any changes at all.
Flash in a file loader then.
-
@PleegWat said in 3D printing guide for n00bs:
@Polygeekery said in 3D printing guide for n00bs:
Reserved
Doesn't nodebb have a time limit after which you can't edit your own posts anymore?
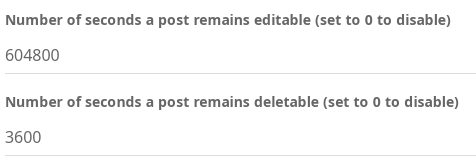
Yes, but I have no idea what that time limit is. I am hoping to get most of it written up in the coming days.
I'm wondering if maybe we shouldn't handle this like the Song of the Day comment thread? Keep this all for on-topic Instructables (but with cursing and occasional coarse humor) type of posts, but another thread to discuss the how-to n00b side of 3D printing and to ask questions? If possible I would like to keep things fairly contiguous so that if someone wants to get a rundown on getting in to 3D printing they don't have to filter through hundreds of posts asking questions and discussing random off-topic shit to find what they want.
Or maybe this doesn't have enough general appeal so the whole point is
 ? I'm libertarian. I don't believe that everyone needs to believe as I do or be into the things that I am or make the decisions that I have.
-
@boomzilla said in 3D printing guide for n00bs:
@PleegWat said in 3D printing guide for n00bs:
@Polygeekery said in 3D printing guide for n00bs:
Reserved
Doesn't nodebb have a time limit after which you can't edit your own posts anymore?
You're going to make me do math, aren't you? I'm going to transpose some numbers in my head or add in a zero or two and think that I have several decades to edit those posts.
I mean, I could pop open the calculator app and divide by 86,400. But that does not lead to comedic results.
-
@Polygeekery well like, general appeal is tricky on a specialist site. Seems to have some specific appeal? also, there's the question of how much of it can appear how quickly.
-
@Gribnit said in 3D printing guide for n00bs:
@Polygeekery said in 3D printing guide for n00bs:
You have to recompile and reflash the firmware to make any changes at all.
Flash in a file loader then.
 It would require a not insignificant architectural change to Marlin itself.
-
@Polygeekery said in 3D printing guide for n00bs:
I'm wondering if maybe we shouldn't handle this like the Song of the Day comment thread? Keep this all for on-topic Instructables (but with cursing and occasional coarse humor) type of posts, but another thread to discuss the how-to n00b side of 3D printing and to ask questions?
That could be a good way to keep the relevant info easy to find, but if we can increase or remove the time limit it would be better. And/or a wiki (but with swearing and coarse humour).
@boomzilla is there a max on the editing timeout? Can you set it to a century (3155760000 seconds)?
e: If it's a 32 bit signed int we can get 68 years. I think it would still be enough for one thread
-
@hungrier said in 3D printing guide for n00bs:
That could be a good way to keep the relevant info easy to find, but if we can increase or remove the time limit it would be better.
If we want to keep relevant info easy to find then we need someplace to Jeff the noise that is already here to. @boomzilla or any other @moderator would you care to oblige please?
I know, I know,
. Pretty please?
-
Added this: https://what.thedailywtf.com/post/1840455
-
@Polygeekery said in 3D printing guide for n00bs:
@boomzilla said in 3D printing guide for n00bs:
@PleegWat said in 3D printing guide for n00bs:
@Polygeekery said in 3D printing guide for n00bs:
Reserved
Doesn't nodebb have a time limit after which you can't edit your own posts anymore?
You're going to make me do math, aren't you? I'm going to transpose some numbers in my head or add in a zero or two and think that I have several decades to edit those posts.
I mean, I could pop open the calculator app and divide by 86,400. But that does not lead to comedic results.
@error_bot eval 604800/86400
-
@Polygeekery said in 3D printing guide for n00bs:
You're going to make me do math, aren't you?
No one is making you do math. But I think you know me well enough that I'm not going to do it for you.
-
@PleegWat said in 3D printing guide for n00bs:
@error_bot eval 604800/86400
Think @error_bot has evolved another step. It's also too
to do math for other people.
-
@Polygeekery said in 3D printing guide for n00bs:
The end of the filament only ever belongs in three places. Firmly gripped in your hand, in your extruder, or threaded through the retainer holes on the spool.
Also, don't drop your filament roll, especially if the end of the filament is either in your hand or in the extruder.
-
@cvi said in 3D printing guide for n00bs:
Also, don't drop your filament roll, especially if the end of the filament is either in your hand or in the extruder.
Make sure your printer is pretty level and that your spool holder is not bent, because those two can add up to there not being enough lip on the spool holder to do it's one job.
Addendum to the footnote on your tip: When spools stop rotating (because they are on the floor) the filament starts coming off the side with every wrap putting a full twist into the filament. BMG type extruders hold very well so they don't allow the filament to twist at all and eventually you end up with a disaster that I am unable to put into words. Loops and knots and braids and tangles that only automated machinery are capable of.
-
@Polygeekery said in 3D printing guide for n00bs:
Make sure your printer is pretty level and that your spool holder is not bent, because those two can add up to there not being enough lip on the spool holder to do it's one job.
Pro tip:
Soporte bobina platsa (techo y suelo) - Filament spool holder (2models) by AlbChronos
Soporte para bobinas de filamento para colocar en la parte superior de mueble. Queda suspendida y soportada por un eje con rodamientos facilitando el giro pero al mismo tiempo bien trabada sin posibilidad de que se salga. Rodamientos 608zz 8x22x7. Filament spool holder to be placed on the top of...
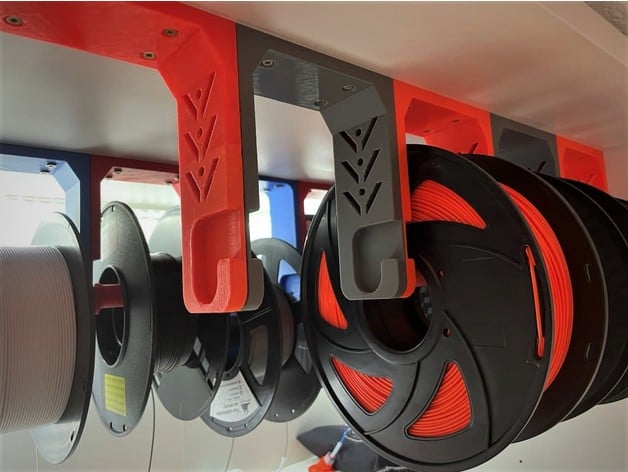
That is the best spool holder I have used. But it may not work for everyone. Due to how my printers are racked I have easy overhead places to fasten them to.
-
Speaking of spool holders, I found one a few days ago while looking for something completely different. Haven't tried it yet but it looks like it would work pretty well:
TUSH - The Ultimate Spool Holder by filamentry
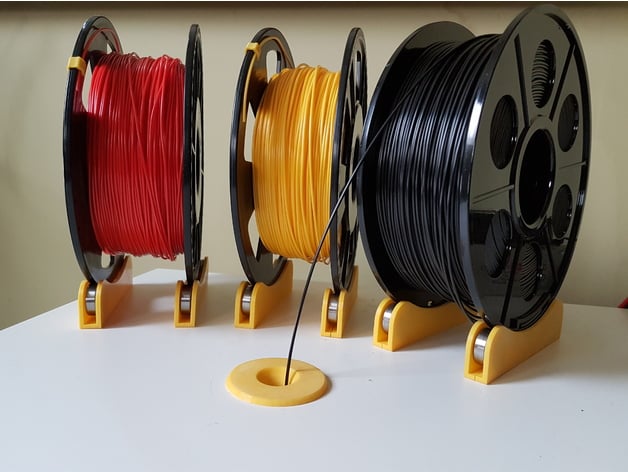
Introducing TUSH - The Ultimate Spool Holder v.2. I was using a regular spool holder. Not the most convenient design, if you ask me, because It takes some time to replace the roll. Also, based on 608 bearings, It gives more than requested length of filament since there is no traction. That's why I...
-
@hungrier that one rolls easy enough but is very easy to knock over as the two separate pieces are only held in place by the weight of the filament on top of them and the base is not all that wide. If you want to go that route I would suggest one of the remixes that has a strut to tie the two pieces together, like this one:
https://www.thingiverse.com/thing:4785959
If you don't want to order 608 bearings then the spool holder from Prusa also works pretty well for a "set on the table" type.
You can find the individual files for download on that page. IIRC, they may have been bundled with other stuff that you don't need. If that is the case and figuring out how to split STLs in your slicer isn't easy to figure out then let me know and I can split them out for you.
-
@Polygeekery said in 3D printing guide for n00bs:
@Polygeekery said in 3D printing guide for n00bs:
Make sure your printer is pretty level and that your spool holder is not bent, because those two can add up to there not being enough lip on the spool holder to do it's one job.
Pro tip:
Soporte bobina platsa (techo y suelo) - Filament spool holder (2models) by AlbChronos
Soporte para bobinas de filamento para colocar en la parte superior de mueble. Queda suspendida y soportada por un eje con rodamientos facilitando el giro pero al mismo tiempo bien trabada sin posibilidad de que se salga. Rodamientos 608zz 8x22x7. Filament spool holder to be placed on the top of...
That is the best spool holder I have used. But it may not work for everyone. Due to how my printers are racked I have easy overhead places to fasten them to.
I don't speak Spanish very well, will this still work for me?
-
@Gribnit said in 3D printing guide for n00bs:
I don't speak Spanish very well,
To be fair, your English is also pretty shit.
@Gribnit said in 3D printing guide for n00bs:
will this still work for me?
STLs are just geometry, and math is the universal language, so it should work for everyone. Whether it works for you......it's a cointoss at best.

 Amazon.com
 Printables