Today in Blakeyrat is always several years behind in every tech trend news...
-
First "real" print was unsatisfactory. Printed some very simple caps for power tool batteries (to protect the terminals from shorting when they're not plugged into a tool or the charger). I needed 3 of them, so I duplicated the model and put 3 of them side-by-side. (I might have been able to fit 4 of them into the build volume by rotating them 90° and maybe offsetting them, but I didn't need 4, so no point.)
I failed to clean the build platform adequately, and 2 of the 3 instances didn't adhere. The one that did turned out fine, but the other two fell off before they were even tall enough to be seen through the opaque liquid resin, so I had no clue why they weren't printing until I went to pour the left-over resin back into the bottle.
Got some 91% isopropanol this morning. It may not work as well as the 95% ethanol they recommend, but it seems to be adequate.
I tried again after cleaning the build plate with isopropanol, and all three printed fine. In fact, one of the copies adhered so well I practically had to chisel it off the build plate. I dinged the build plate up a little in the process; if this turns out to be a significant problem, I certainly have the metal-finishing tools to buff the nicks out.
Next project: Print a cute dog figurine I downloaded from Thingiverse. After that, design some brackets to hold fans in the windows of my workshop.
-
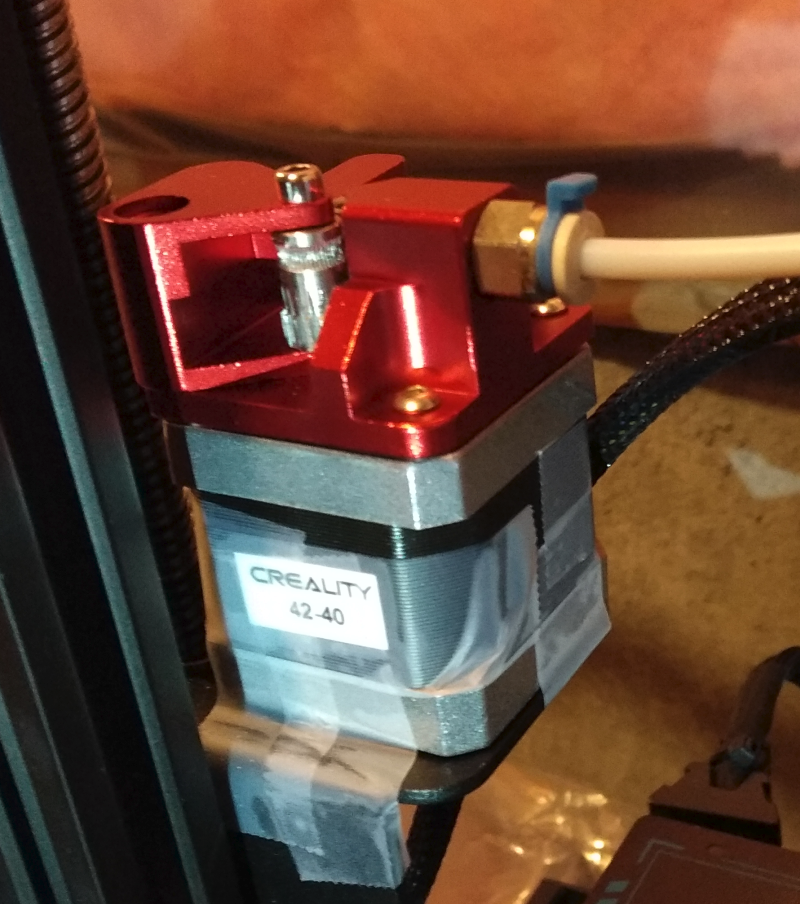
@hungrier Status: Took off the old gear, ground a flat part on the motor shaft, affixed the new gear (the shaft was just barely tall enough to hold it at the right height) and installed the new extruder. Now calibrating the e-steps.
-
@hungrier Update: Just barely tall enough has proven to be just barely not tall enough, as the thing slips off after a bit of usage. Maybe I will have to get a new motor after all
-
I've ordered a new stepper motor, but the estimated shipment may not come for a while - the date range is anywhere from Saturday to two weeks from now. So while I wait I have a number of options I could try:
- Re-affix the old hob gear to the motor and use the old extruder while I wait
- Try to tap the motor shaft from the bottom to see if it can come out by an extra couple mm on top. I don't know how the shaft is held in internally so this may not work at all
- Mount the stepper on top of the bracket instead of hanging from below, in order to bring the extruder closer to the motor body. This could interfere with the top frame if I wanted to print anything super tall
I'm open to other ideas as well if anyone has them
-
@HardwareGeek said in Today in Blakeyrat is always several years behind in every tech trend news...:
Next project: Print a cute dog figurine I downloaded from Thingiverse.
Did not print properly. My own fault. I hollowed it out manually in Blender. (Yes, the slicer software has a feature to hollow an object automatically; I did not discover that feature until after I'd done it manually.) Hollowing it left the inner surface with self-intersecting regions near some sharp edges, like the tips of the ears. I tried to smooth and simplify the inner surface, but I smoothed it too much near some concave edges (e.g., where the legs meet the body), which left the inner surface intersecting the outer surface, but I didn't notice this.
Oh, well. Easy fix; just reload the original STL file, and let the slicer software do its magic automatically.
-
@hungrier said in Today in Blakeyrat is always several years behind in every tech trend news...:
- Try to tap the motor shaft from the bottom to see if it can come out by an extra couple mm on top. I don't know how the shaft is held in internally so this may not work at all
Don't know about your's steppers, but in some motors a tap from the bottom will apply forces to the top lid, near the axis, with potential deformation or breackage.
I would consider it the last option, a make-it or break-it one
-
@HardwareGeek said in Today in Blakeyrat is always several years behind in every tech trend news...:
Easy fix; just reload the original STL file, and let the slicer software do its magic automatically.
Still no joy. It's a purely decorative little figurine and doesn't need much strength, so I set the hollow/fill settings to 1.0mm wall thickness and no infill to save resin. (In addition to the cost — which really isn't that much, <$2/print — I have a limited supply of resin and no idea when I'll get the resin I ordered.) It didn't like the thin walls, and in places the wall thickness was 0, leaving holes.
 I also got, for some unknown reason, some very prominent layer discontinuities; it's probably not a coincidence that these corresponded to where the holes were, although the holes spanned many layers. The largest holes are probably at least 1mm in height (and >5mm in width), which is 20 0.05mm layers.
Ran it through the slicer again with 2mm wall thickness (and different support structure, since it deleted all the supports when I redid the hollowing; hopefully, it won't take dynamite to get it off the build plate this time). Third time's the charm?
-
@HardwareGeek said in Today in Blakeyrat is always several years behind in every tech trend news...:
Third time's the charm?
Nope. Supports failed.
 Corgis are supposed to have short, stumpy legs, but not no legs. My son thinks it's cute and wants to keep it, which is fine with me.
I'm not sure exactly how the failure resulted in what came out of the printer. The legs aren't missing, exactly; they seem to have printed, but collapsed into the body, or something. The supports printed, at least partially, but the legs aren't attached to them. (Supports not shown, obviously. I basically had destroy them to get the print off the build plate.)

The bottoms of the paws are rounded, so I didn't want to position it directly on the build plate and flatten out the bottoms of the feet, so I positioned it floating a mm or two above the plate, then added supports. This worked for the first two prints, but I noticed the very tips of the ears were too tall to print, so I lowered it closer to the build plate just a little. For some reason, the software won't generate supports automatically for parts of the model that are almost touching the build plate, so I manually added supports for each leg. I guess I didn't add enough, because all 4 legs failed in exactly the same way. (Some of the automatic supports on the chest didn't print properly, either, but there were enough others that the failure of those supports didn't cause the print to fail in that area, not catastrophically, at least.)
-
@HardwareGeek tis a fine dachshund.
-
@HardwareGeek said in Today in Blakeyrat is always several years behind in every tech trend news...:
For some reason, the software won't generate supports automatically for parts of the model that are almost touching the build plate, so I manually added supports for each leg.
I've only worked with FDM so I may be talking out my ass, but it could be that the slicer wants to put an air gap between the support and whatever it's supporting, so it sees that there's no room to add a support in that tiny bit of clearance. I would put the model directly on the build plate so it has something to stick to, and then let the rest build on top of that. Or add a raft (should be an automatic setting in the slicer) to ensure the thing sticks to the surface. But maybe resin printing is Different™
-
@hungrier said in Today in Blakeyrat is always several years behind in every tech trend news...:
ensure the thing sticks to the surface
Except for the first print of the battery caps, when I didn't have solvent to clean the surface properly, that doesn't seem to be a problem, at all. Or rather, it's a problem, but in the opposite direction. I literally have to clamp the build plate in a vise and use a hammer and chisel to break the print free from the surface.
-
@HardwareGeek
 Like I said I've only done FDM (and even then I'm still mostly a noob). I guess resin printing has different problems
-
@hungrier And I'm still very much a noob and just learning what those problems are. (But at least I don't have to worry about extruders and hot ends.)
-
@hungrier said in Today in Blakeyrat is always several years behind in every tech trend news...:
Mount the stepper on top of the bracket instead of hanging from below, in order to bring the extruder closer to the motor body. This could interfere with the top frame if I wanted to print anything super tall
I ended up doing this. Everything was very easy to line up and secure directly on the motor, without it being attached to the machine, and I was able to plug in the wire and secure it to the bracket with some Scotch tape:
I did that yesterday and thought "that's perfect, there's no possible way I could improve on that" and left it there
Yeah right!
After I confirmed that I could print this way, I got to work in OpenSCAD to make a cage to hold the motor on there more securely. A few hours later I had a design, and after dealing with some stupid temporary problems, eventually I was able to complete this print:
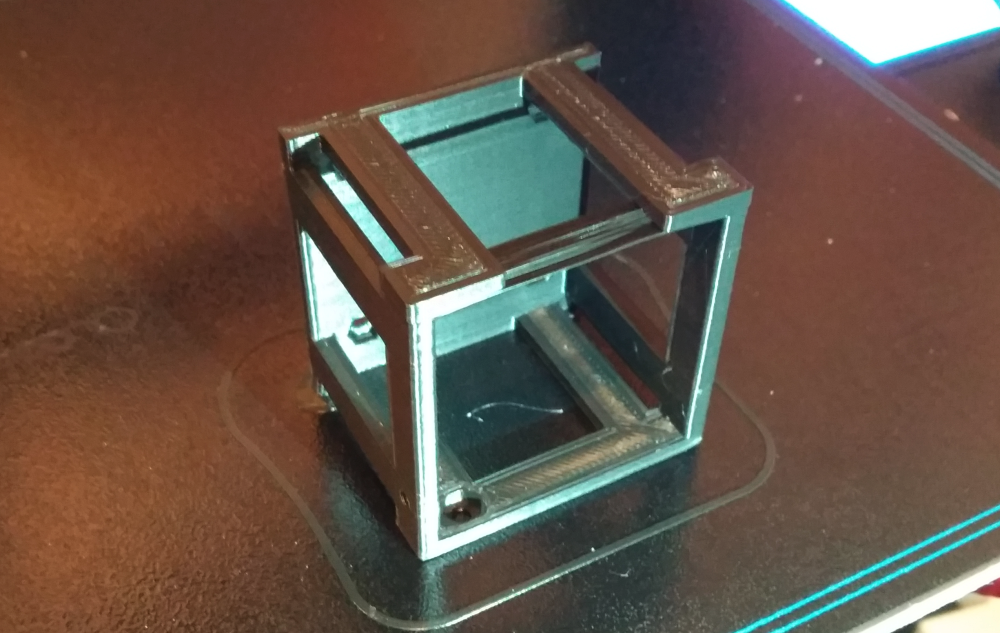
I included some holes with pockets for nuts so I would have something to screw into, and I also had a couple extra holes in case I needed to hold the motor more tightly (spoiler: I didn't, it was already a tight fit right off the bat). I also printed it this way, with a sacrificial support built into the design, so I could print the whole thing without adding any supports in the slicer.
-
@HardwareGeek said in Today in Blakeyrat is always several years behind in every tech trend news...:
@HardwareGeek said in Today in Blakeyrat is always several years behind in every tech trend news...:
test print of the provided file is in progress
Test print was mostly successful, but final result was less than satisfactory, due to not having the proper solvent to remove the resin residue from the print.
Also, TIL that if you are looking for denatured alcohol at Walmart, Home Depot, Lowe's, etc., you'll find acetone, paint thinner, lacquer thinner, turpentine, Goof Off, etc. But you will not find denatured alcohol. (You may be able to find it labeled as a fuel — "Do not use as a solvent or thinner" — but only in small, expensive quantities.) And TIL it's been banned entirely in California. Because California is run by a bunch of morons.
Huh. I thought I had bought some recently but now I realize that was lacquer thinner. My can of denatured alcohol looks pretty old. I was able to find some on Lowes, though it has a bit of an identity crisis:
Paint Cleaners, Chemicals & Additives at Lowes.com

Find paint cleaners, chemicals & additives at Lowe's today. Shop paint cleaners, chemicals & additives and a variety of paint products online at Lowes.com.
They claim to have it in stock at my local store.
-
@boomzilla Thanks. Apparently, I can pick it up at my local store in 3-7 days, or I can get it delivered in
 . (After a little more searching, they have the non-"green" version in stock. Since ethanol is ethanol, presumably the difference is in the other 5% used to make it undrinkable.) However, the IPA seems to do a very adequate job, I can get it delivered in as little as a couple of hours (if I need it that quickly, or with my next grocery delivery, if I don't), and the ethanol/methanol costs very nearly 3x the IPA. So I think I'll continue using IPA unless/until I find out there's a reason I need to use the much more expensive ethanol.
-
@boomzilla said in Today in Blakeyrat is always several years behind in every tech trend news...:
@HardwareGeek said in Today in Blakeyrat is always several years behind in every tech trend news...:
@HardwareGeek said in Today in Blakeyrat is always several years behind in every tech trend news...:
test print of the provided file is in progress
Test print was mostly successful, but final result was less than satisfactory, due to not having the proper solvent to remove the resin residue from the print.
Also, TIL that if you are looking for denatured alcohol at Walmart, Home Depot, Lowe's, etc., you'll find acetone, paint thinner, lacquer thinner, turpentine, Goof Off, etc. But you will not find denatured alcohol. (You may be able to find it labeled as a fuel — "Do not use as a solvent or thinner" — but only in small, expensive quantities.) And TIL it's been banned entirely in California. Because California is run by a bunch of morons.
Huh. I thought I had bought some recently but now I realize that was lacquer thinner. My can of denatured alcohol looks pretty old. I was able to find some on Lowes, though it has a bit of an identity crisis:
Find paint cleaners, chemicals & additives at Lowe's today. Shop paint cleaners, chemicals & additives and a variety of paint products online at Lowes.com.
They claim to have it in stock at my local store.
Flavor's maybe a little off by now but it still oughta do the job, drink up.
-
@HardwareGeek said in Today in Blakeyrat is always several years behind in every tech trend news...:
So I think I'll continue using IPA unless/until I find out there's a reason I need to use the much more expensive ethanol.
It's a better use than drinking, for sure.
-
@boomzilla I figured somebody would eventually make a joke about the other kind of IPA.
-
@HardwareGeek said in Today in Blakeyrat is always several years behind in every tech trend news...:
@boomzilla I figured somebody would eventually make a joke about the other kind of IPA.
Predictable is predictable.
-
Well, that didn't exactly go according to plan.
I tried to make a funnel to pour/filter unused resin back into the bottle. Several filters came with the printer, but they don't fit into the mouth of the bottle, and if you try to hold them above the mouth of the bottle, there is a very high probability of some of the resin dribbling down the outside of the bottle. So a funnel is in order.
I found a model of a cap to fit those specific bottles, then sliced&diced it to add a funnel. The build volume of the printer is pretty narrow in the Y direction, so the funnel is incomplete, but it should be good enough to support the filter cone. I got the walls of the funnel a bit thin, but it doesn't need much strength, and it printed fine.
However, removing the finished print from the build plate was unsuccessful. Catastrophically so. There are many pieces of bottle cap and funnel in my workshop. I couldn't even chisel the last little bits off; I wound up having to sand the build plate to remove the last stuck-on bits.
I was reading that if the print fails to adhere to the build surface, one of the things to try was increasing the exposure for the bottom layers. Maybe I need to decrease the exposure. (I've been using default settings for everything so far.)
-
I've gotten a bit more experience with OpenSCAD and I'm finding it a lot more natural to do whatever in it. From dead simple things like a spacer for a 608 bearing, to more complex like the motor cage I designed
 and hexnut turning handles, I really like the way it works.
I haven't been able to do any fancy stuff like chamfers or sweeping a 3D shape through different 2D profiles but maybe I'll be able to do stuff like that with more advanced techniques.
-
@HardwareGeek I reprinted the funnel after making a few changes. I made the walls of the funnel, which were pretty thin in the first print, thicker and stronger. I rounded off a lot of edges, not coincidentally significantly reducing the area of the top edge of the funnel that is in contact with the build plate. And I reduced the exposure of the "bottom" layers from the default 60 seconds to 50. The print popped off the build plate fairly easily; although it did take a tap with a mallet on the chisel (plastic scraper), it didn't require the "Hulk smash" the previous print did.
-
I got the new stepper motor a few days ago and installed it. It Just Worked™, I didn't even have to readjust my e-steps (although maybe I'll go back and do a bunch of calibration and really dial in my settings later). I did notice after a bit that one of the gears was grinding against the aluminum body, which was only surprising in that it became apparent right away. So I did some hardware modification and it doesn't do that anymore, but it does sometimes click for a bit at random during a print. Loosening up some of the screws helps with that but I'll see if I can find some lubricant for the washer and gears to stop it from binding up at all.
-
@HardwareGeek Ӏsղ'ե ҽѵҽɾყեհíղց ɾմƖҽժ ҍყ ყօմɾ թɾҽsíժҽղե?
-
@hungrier said in Today in Blakeyrat is always several years behind in every tech trend news...:
I got the new stepper motor a few days ago and installed it. It Just Worked™, I didn't even have to readjust my e-steps (although maybe I'll go back and do a bunch of calibration and really dial in my settings later). I did notice after a bit that one of the gears was grinding against the aluminum body, which was only surprising in that it became apparent right away. So I did some hardware modification and it doesn't do that anymore, but it does sometimes click for a bit at random during a print. Loosening up some of the screws helps with that but I'll see if I can find some lubricant for the washer and gears to stop it from binding up at all.
𝕴𝖙 𝖎𝖘 𝖆𝖑𝖜𝖆𝖞𝖘 𝖍𝖆𝖗𝖉 𝖜𝖎𝖙𝖍 𝖓𝖔 𝖑𝖚𝖇𝖗𝖎𝖈𝖆𝖓𝖙!
-
@Nagesh I can't tell if you're trying to summon a demon with those fancy fonts, but in this thread you would have to 3D print one instead
-
 Turning A MIG Welder Into A Metal 3D Printer
Metal 3D printers are, by and large, many times more expensive than their FDM and resin-based brethren. It’s a shame, because there’s plenty of projects that would benefit from being ab…
-
@Zerosquare Interesting idea. I'll have to RTFA someday,
 willing.
In the meantime, I'm learning more about resin printing:
I finally got a good print of that dog model. It did not like being put on supports above the build plate. I had to put the feet flat on the build plate, which means more clean-up on the feet, but at least in printed.
Hollow models do need a drain hole. A significant(-ish, maybe 1 ml) amount of uncured liquid resin was trapped inside the finished print.
The post-cure UV light penetrates the model enough to cure the trapped resin during normal (~3 min) post-cure, at least for clear resin. I haven't tried it with pigmented resin, yet.
There are a variety resins available for SLA/LCD printers, including ones formulated for lost-
waxplastic casting (I already knew about those, of course); soft, rubbery, silicone-like resin, and one company makes an actual silicone resin. (There are other companies that make silicone resins, but they are heat-cured, not UV-cured, and need special printers. Both are currently unavailable to purchase, and require paying them to print the model for you.)I learned the difference between SLA and DLP and some of the pros/cons of each. DLP has the advantage of being constant-time per layer, regardless of how many voxels are on the layer. DLP has the disadvantage of being constant-time per layer, regardless of how few voxels are on the layer.
I learned to clean the build plate after finishing a print, rather than waiting until I want to start the next print. Of course, if one is making prints one after another, they're the same picture. However, if a few days elapse between prints, well, let's just say clean-up is significantly easier if the resin is fresh. Likewise for the resin vat.
The plastic scraper provided with the printer is useless for removing prints from the build plate; the resin is harder than the plastic and damages the scraper without popping the print free. The best method I've found is to slide the edge of a sharp-ish knife under the edge of the print. It leaves visible marks on the aluminum plate, but it doesn't seem to affect adhesion and doesn't significantly affect the finish of the bottom surface, which isn't smooth anyway.
-
@Zerosquare said in Today in Blakeyrat is always several years behind in every tech trend news...:
Turning A MIG Welder Into A Metal 3D Printer
Metal 3D printers are, by and large, many times more expensive than their FDM and resin-based brethren. It’s a shame, because there’s plenty of projects that would benefit from being ab…
Once the part is successfully printed (which it sounds like they're still struggling with) they'll need to use a heat treatment post processing step to reduce the phenomenal amount of stress in the part. And they'd probably find it easier if they keep their enclosure rather hotter. (I know someone who was working on printing metal components, and it required a furnace and high powered lasers. But the parts are now in service in jet engines…)
-
Tonight, I got to experience the fun of changing the FEP film on the resin vat. It's not difficult, but it is tedious. There are a lot of screws that hold the film.
-
Well, [much swearing redacted]! After changing the FEP film, the next print was mostly successful. Except...
-
Ran out of resin ~70% through the print. Since I did the ~7-hour print overnight, I didn't know this — not that I can see much while it's printing, anyway. The printed object is mostly inside the resin vat until it gets fairly tall, and even then it's hard to see what's happening inside the vat. The build plate is opaque, and it's kinda dark, especially when using dark-colored resin; it's supposed to be, because the resin is sensitive to blue/violet/ultraviolet light.
-
The print is big. Really big. 2x the size it's supposed to be. I swear I know the difference between radius and diameter. Inch/mm/radius/diameter conversions in my head are not terribly reliable. Or maybe they are, with terribly being the operative word. Something that's supposed to be 2" in diameter is not 50mm in radius.
Maybe I should get a real (free) CAD program. A lot of what I want to print is more artistic — eh, that looks good; about 1/2 mm is close enough — and anything that really matters can be cleaned up with a drill or file or whatever after printing. But this particular project is more CAD-like. Most of the dimensions don't really have to be exact — except when matching 2 halves of a print that has to be fitted together because it's too big for the printer — did I mention that the print that's 2x too big had to be chopped into 70 pieces because it's way too big for the printer, almost exactly 2x too big in X and Y? — but a few do, and others have to be reasonably close (not off by 2x). It would be nice if I were using a tool that showed dimensions as I'm working. It would also be nice if it were really easy to switch back and forth between metric and imperial — design it in metric, like a good engineer, but use inches for a sanity check, because something that's supposed to be roughly, say, 3 inches in diameter shouldn't be almost 6 inches and no wonder it won't fit in the printer &@*#(&@!!!!
-
-
@HardwareGeek 2.5 isn't hard to remember and is plenty close to avoid 2X error.
Of course, I have the advantage of having one thumb joint an inch wide and having 2.54 thumbs on the other hand, but there's probly other mnemonics.
-
@hungrier said in Today in Blakeyrat is always several years behind in every tech trend news...:
@hungrier Update: Just barely tall enough has proven to be just barely not tall enough, as the thing slips off after a bit of usage. Maybe I will have to get a new motor after all
Couldn't you flip the gear and install it upside down so the set screw was lower?
-
@hungrier said in Today in Blakeyrat is always several years behind in every tech trend news...:
Try to tap the motor shaft from the bottom to see if it can come out by an extra couple mm on top. I don't know how the shaft is held in internally so this may not work at all
The shafts are almost always glued into place. If you had the tools to do it without breaking the rotor you would have to completely remove it, clean the parts and re-epoxy it into place.
-
@cabrito said in Today in Blakeyrat is always several years behind in every tech trend news...:
Don't know about your's steppers, but in some motors a tap from the bottom will apply forces to the top lid, near the axis, with potential deformation or breackage.
I would consider it the last option, a make-it or break-it oneGood point, and something I forgot to mention. If you want to remove the shaft from a stepper you have to disassemble it first or you will almost certainly destroy the whole assembly.
-
@hungrier said in Today in Blakeyrat is always several years behind in every tech trend news...:
@HardwareGeek said in Today in Blakeyrat is always several years behind in every tech trend news...:
For some reason, the software won't generate supports automatically for parts of the model that are almost touching the build plate, so I manually added supports for each leg.
I've only worked with FDM so I may be talking out my ass, but it could be that the slicer wants to put an air gap between the support and whatever it's supporting, so it sees that there's no room to add a support in that tiny bit of clearance. I would put the model directly on the build plate so it has something to stick to, and then let the rest build on top of that. Or add a raft (should be an automatic setting in the slicer) to ensure the thing sticks to the surface. But maybe resin printing is Different™
It is very different. The slicer will not introduce an airgap as the supports have to be securely adhered.
With SLA prints it is best to angle them to reduce the amount of the print that is in the car at a time. I usually shoot for 45 degrees along the longest axis. The reason being is that having to break the suction at the bottom is the most likely cause of failure and coming loose from the build plate. You also want your drain holes close to the build plate for the same reason. If you place them where the model will finish printing then they don't help relieve suction.
-
@HardwareGeek said in Today in Blakeyrat is always several years behind in every tech trend news...:
@hungrier said in Today in Blakeyrat is always several years behind in every tech trend news...:
ensure the thing sticks to the surface
Except for the first print of the battery caps, when I didn't have solvent to clean the surface properly, that doesn't seem to be a problem, at all. Or rather, it's a problem, but in the opposite direction. I literally have to clamp the build plate in a vise and use a hammer and chisel to break the print free from the surface.
That really shouldn't be happening. How large are your rafts??
-
@HardwareGeek said in Today in Blakeyrat is always several years behind in every tech trend news...:
Well, that didn't exactly go according to plan.
I tried to make a funnel to pour/filter unused resin back into the bottle. Several filters came with the printer, but they don't fit into the mouth of the bottle, and if you try to hold them above the mouth of the bottle, there is a very high probability of some of the resin dribbling down the outside of the bottle. So a funnel is in order.
I found a model of a cap to fit those specific bottles, then sliced&diced it to add a funnel. The build volume of the printer is pretty narrow in the Y direction, so the funnel is incomplete, but it should be good enough to support the filter cone. I got the walls of the funnel a bit thin, but it doesn't need much strength, and it printed fine.
However, removing the finished print from the build plate was unsuccessful. Catastrophically so. There are many pieces of bottle cap and funnel in my workshop. I couldn't even chisel the last little bits off; I wound up having to sand the build plate to remove the last stuck-on bits.
I was reading that if the print fails to adhere to the build surface, one of the things to try was increasing the exposure for the bottom layers. Maybe I need to decrease the exposure. (I've been using default settings for everything so far.)
There is a spreadsheet of resins and known good working print settings that you can find online. I can look for it later when we get home or you should be able to find it on the Photon subreddit.
-
@hungrier said in Today in Blakeyrat is always several years behind in every tech trend news...:
it does sometimes click for a bit at random during a print.
Is it clicking or is your stepper losing steps?
-
@Zerosquare said in Today in Blakeyrat is always several years behind in every tech trend news...:
Turning A MIG Welder Into A Metal 3D Printer
Metal 3D printers are, by and large, many times more expensive than their FDM and resin-based brethren. It’s a shame, because there’s plenty of projects that would benefit from being ab…
-
Smells like... 15 years to a turnkey consumer product. 14 if @HardwareGeek gives up.
-
@Gribnit there are turnkey printers, but they come with a closed ecosystem of consumables and such and are significantly more expensive than the Ender 3 and Anycubic Photon.
As I mentioned upthread if you want turnkey you can pickup the Prusa MK3S, purchase Prusament filaments and expect a high success rate right out of the box. They work really well, and their filament is top-notch. But you're also looking at $1,000+shipping for the printer and you can expect 25-50% more on filament cost before accounting for shipping. But PrusaSlicer has profiles for Prusament built-in and they work well.
But if you want to get into printing for cheap, learn how it all works, and especially if you want to utilize cheaper filaments you can save a ton of money and learn a lot more in the process.
Beyond even Prusa there are a bunch of much more expensive printers that will probably give even better results but then we are definitely outside of what any sane person might consider "consumer".
-
@Polygeekery said in Today in Blakeyrat is always several years behind in every tech trend news...:
@Gribnit ... any sane person

-
@HardwareGeek said in Today in Blakeyrat is always several years behind in every tech trend news...:
@Polygeekery said in Today in Blakeyrat is always several years behind in every tech trend news...:
@Gribnit ... any sane person
You're the crazy ones. All of you! You'll see! You'll all see!!!
-
@Polygeekery said in Today in Blakeyrat is always several years behind in every tech trend news...:
@hungrier said in Today in Blakeyrat is always several years behind in every tech trend news...:
it does sometimes click for a bit at random during a print.
Is it clicking or is your stepper losing steps?
Whatever it was, the problem worked itself out after a day or two. I think the gears must have been catching on some corner or something on the aluminum base, and eventually wore it down enough to consistently clear it.
-
 Marine Corps corporal gets 3D-printed teeth with jaw reconstruction - UPI.com

A Marine Corps member is the first recipient of the Defense Department's first jaw reconstruction using 3D-printed teeth.
-
@boomzilla said in Today in Blakeyrat is always several years behind in every tech trend news...:
Marine Corps corporal gets 3D-printed teeth with jaw reconstruction - UPI.com
A Marine Corps member is the first recipient of the Defense Department's first jaw reconstruction using 3D-printed teeth.
Hope he likes being called "Jaws", there's no avoiding it.
-
@Polygeekery said in Today in Blakeyrat is always several years behind in every tech trend news...:
@HardwareGeek said in Today in Blakeyrat is always several years behind in every tech trend news...:
Well, that didn't exactly go according to plan.
I tried to make a funnel to pour/filter unused resin back into the bottle. Several filters came with the printer, but they don't fit into the mouth of the bottle, and if you try to hold them above the mouth of the bottle, there is a very high probability of some of the resin dribbling down the outside of the bottle. So a funnel is in order.
I found a model of a cap to fit those specific bottles, then sliced&diced it to add a funnel. The build volume of the printer is pretty narrow in the Y direction, so the funnel is incomplete, but it should be good enough to support the filter cone. I got the walls of the funnel a bit thin, but it doesn't need much strength, and it printed fine.
However, removing the finished print from the build plate was unsuccessful. Catastrophically so. There are many pieces of bottle cap and funnel in my workshop. I couldn't even chisel the last little bits off; I wound up having to sand the build plate to remove the last stuck-on bits.
I was reading that if the print fails to adhere to the build surface, one of the things to try was increasing the exposure for the bottom layers. Maybe I need to decrease the exposure. (I've been using default settings for everything so far.)
There is a spreadsheet of resins and known good working print settings that you can find online. I can look for it later when we get home or you should be able to find it on the Photon subreddit.
Ew, I feel dirty; I have Reddit on me. But I found it. Thanks.
Do you have any recommendations for slicers for the Photon? I've been using the Photon Workshop that came with it, and it certainly works, but it has a number of deficiencies.
- Very poorly documented. The only "Help" is "About Us", which is very not helpful. The "manual" is just release notes of the new features in the current version, not an actual manual.
- Creating supports leaves a lot to be desired. Automatically-generated supports are often so close to a vertical surface that they become part of the surface. Supports can be added and deleted manually, but so far the "Edit" button doesn't seem to do anything; at least I have never been able to edit an existing support in any way (except to delete it). Manually-added supports are always simple vertical structures; there seems to be no way to create a support at an angle.
- General bugginess. E.g., "Undo" doesn't work at all.
I found a web page that lists a half-dozen slicers that will work with the Photon; of course, all have pros and cons. What, if anything, do you recommend?
-
Also, my son has 5 kg of filament in assorted colors en route (give or take delivery distortion field) to him. 2 kg from Prusa, currently in Leipzig, Germany. 1 kg from Paramount 3D, somewhere in IL. 2 kg from Hatchbox 3D, one somewhere in TX (but not scheduled to get here until Saturday,
) and a shipping label in CA.